

In Windows 10, many Microsoft apps as well as third-party apps keep running in the background. These are called background apps. Although, they don’t cause any problems they aren’t a necessity as well. This means that you can disable them. After reading this guide, you will be able to disable the background apps in Windows 10 by any means necessary.
Why stop Background Apps?
You may wonder that if the operating system isn’t automatically disabling them, why should I disable them manually? For starters, many of these background apps aren’t necessary for Windows 10 to function which means they are just a waste of resources.
Other apps are required in certain conditions. Most background apps lead to less battery timing, bandwidth wastage, and wastage of other system resources such as processing power and RAM, etc. Luckily, you can disable these apps in Windows 10 to save these resources and enjoy better performance.
Guide to Stop Background Apps
Here are the two methods through which you can stop any background app permanently from running in the background. You will have to manually enable them again from the same settings section. The second method works for devices that are using battery power such as laptops, etc.
1. From Privacy Settings
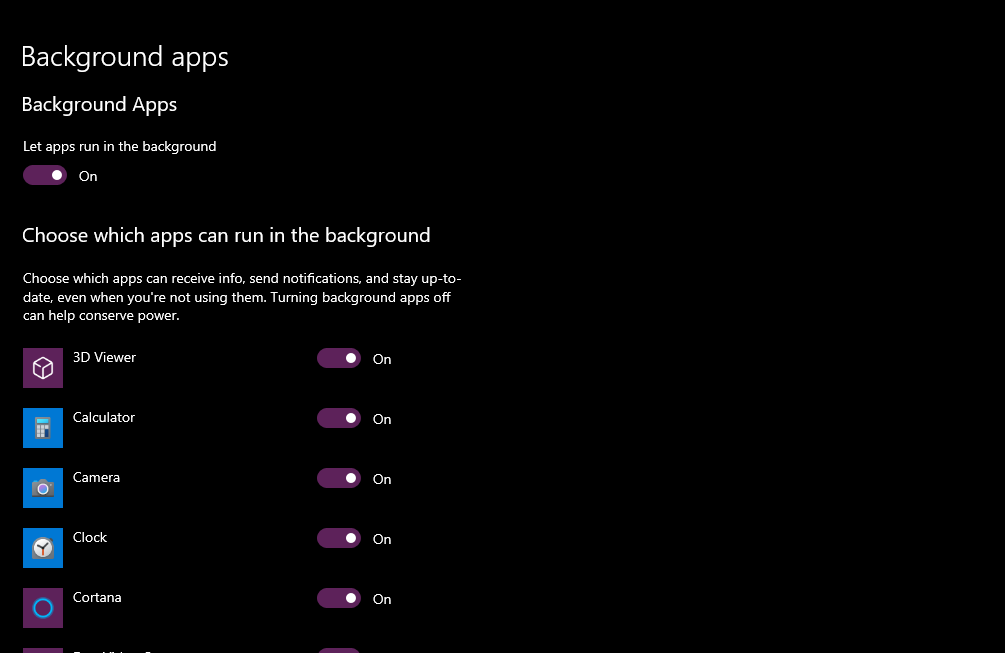
In Windows 10, you can go to the privacy settings menu to disable any or all the background apps with a single click. To do so, follow these steps.
- Go to Windows Settings and Click on Privacy.
- From the side panel, look for Background apps and click on it.
Read More: How to Create a Child Theme in WordPress?
Here, you have two options, one is to disable all the available apps while the other is to manually disable the desired app. For optimal performance and battery usage, you should disable all apps but this can lead to glitches as essential apps will also be disabled. This will stop any or all background apps until you access them again.
2. From Power Settings

If you are a laptop or tablet user, you can enable the battery saver mode in order to stop apps from running in the background. By default, the battery-saver mode is enabled automatically once the power level drops below twenty percent but you can enable it whenever you want from the power settings by following these steps.
- Go to Windows Settings and Click on power.
- From the side panel, look for Battery and click on it.
- Toggle the switch below the Battery Saver option.
Read More: How to install XAMPP on Windows 10
Once the battery-saver option is enabled, all the background apps will be stopped until you access them again or the battery-saver mode is disabled. The battery-saver mode will be disabled automatically when you plug in your device to charge it.
3. From the Group Policy editor
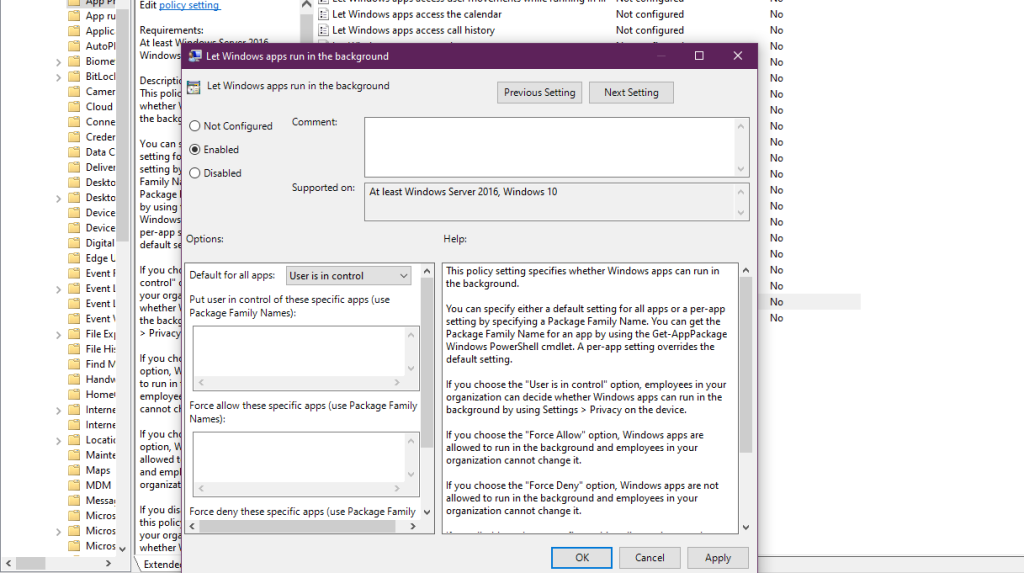
Only users who are using the pro, enterprise, or education version of Windows 10 will be able to disable background apps with this method. So, if you are using the right version, follow these steps.
- Open Run Dialogue with W + R and Search for “gpedit. msc” on the search bar.
- In Group policy editor, go to Computer configuration and Go to administrative templates.
- Go to Windows Components and Double-click on App Privacy.
- Find “Let Windows apps run in the background” and open it.
- Click on Enabled from the top of the screen.
- Go to the bottom and open the menu next to “Default for all apps.”
- Choose the “Force to deny” option and apply the settings.