Why must we create a backup and recovery plan on a PC or Windows 10? This question might occur in your mind, and creating a backup and recovery plan is essential to minimize the risk of the day’s loss. It ensures data protection. Without a backup and recovery plan, data can be lost for multiple reasons, including hardware failure, human error, malware or cyberattacks, software corruption, or natural disaster.
There might be severe consequences in sudden data loss, such as financial costs and loss of productivity damage to your business or individual necessary data. In addition, we can also claim that a backup and recovery plan provides security to your data in Windows 10. Thus, this article will discuss the Pc Backup solutions in Windows 10, the Backup procedure, and how it works in Windows 10.
What is the Concept Behind Data Backup and Recovery? It’s Importance
Data backup and recovery is defined as the process of creating copies of data to store them in a safe location so you can use tell me a story about the data or recover it in case of any data loss or system failure that might take place in Windows 10 due to some error. The concept behind this process ensures the protection of your essential data and a secure place no one can hack it or any cyber virus attack on it.
Importance of Data Backup and Recovery Plan In PC
If you have essential data on your PC, that is important to be protected. It might bring financial or Data loss consequences if the data is lost somehow. To prevent minimizing data loss due to unforeseen circumstances, there is a need to make a data backup and recovery plan in Windows 10. Why is it essential to build Data Backup and Recovery procedure on a PC? The following points explain various reasons except for data protection in a Backup procedure.
Read More: How to Delete the Windows. old folder in Windows 10?
1. Protection Against Hardware Failure in Windows 10
Users can protect their PC against hardware failure by activating data backup or recovery plans. It is very accessible to recover in the event of hardware failure. Users can restore their data from the Backup location to a new hardware drive or PC, ensuring that essential data is not lost. Thus, data backup and recovery are effective ways to protect against hardware failure.
2. Protection Against the Cyber Attack
If you have your business records or data on your PC, you must protect your PC against cyber-attack and keep your system secure against unauthorized access to sensitive data. Cyber-attacks are becoming increasingly common in the digital system; thus, we need to make every assessable effort to keep our system protected. To Maintain PC security, a backup and recovery plan protect from the following cyber-attacks.
- Data backup protects against ransomware to prevent data encryption and make them inaccessible.
- Malware is a common cyber-attack that can corrupt files and data by making them unusable. The recovery procedure protects against malware and viruses.
- Human error in cyber-attack can cause the accidental deletion of files from a PC; activating a backup and recovery plan can prevent your PC from human error.
3. Storage Of Essential Data
You can easily store your essential data in a better location where no unforeseen circumstances can affect the files and data. It is the most common and valuable advantage of a data recovery plan. Further, we will discuss how to activate Backup data recovery on your PC, especially in Windows 10, to secure your essential data.
Methods to Activate Data Backup and Recovery Plan in Windows 10
There are several methods to create a backup and recovery plan in Windows 10 in a straightforward and accessible way. This article discussed the best and most appropriate methods to provide detailed guidance and steps to make it easy to understand and perform. Let’s learn how to minimize data loss by activating the Backup procedure. Keep the following methods in your find and follow the instructions and suggestions while creating a backup and recovery plan in Windows 10.
1. Activate Data Backup and Recovery Through File History
File history is a feature that can be found in Windows 10. This built-in Backup feature allows users to automatically back up files and folders to an external drive or network location to keep the data secure. To use and take advantage of this feature, we need to activate it in Windows 10. Once the file history feature is activated, you can Protect the important files against data loss due to hardware failure, file corruption, cyber-attack, or other issues. Users can add or remove files or folders from the Backup list.
Read More: How to Fix the Steam Disk Write Error on Windows 10?
In addition, we can easily optimize the Backup files and folders at specific intervals, such as the Backup procedure every hour, day, or week. Users can also select which folder to back up and how long to keep the Backup files secure. What files can we store by file history through a backup and recovery plan? There are different types of files or formats in which Data can be stored easily, including documents, music, pictures, videos, desktop folders, and other types of Data can be stored easily.
Step-By-Step Guidance to Activate File History Feature in Windows 10
The file history feature was first developed in Windows 8. To activate this feature, you will need an external hard drive. Then, you can easily copy your necessary data into a secure location. Let’s understand the steps for the Backup procedure.
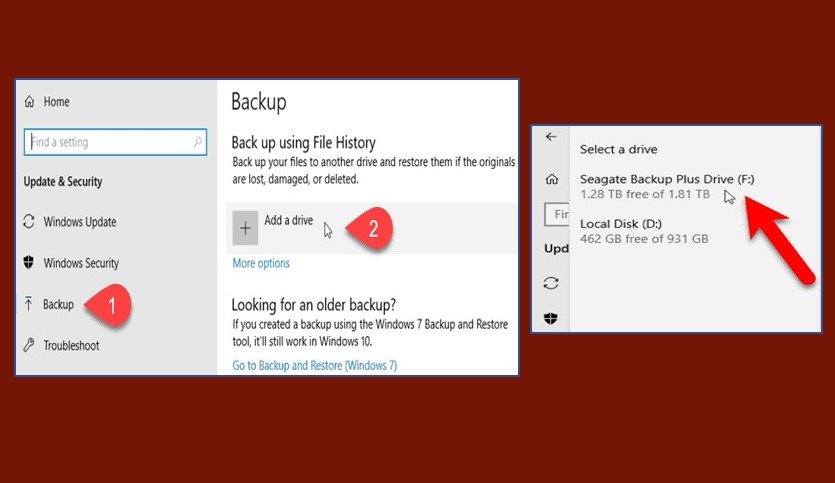
- Step 1: First, connect your external drive with your PC and “Open PC settings” by clicking on the “gear icon” given in the “Start menu.”
- Step 2: Click “Update and Security> Backup>Add a drive.”
- Step 3: All the available drives in Windows 10 will appear on the left side of the screen; select the one you want to choose to make data encryption and data protection.
- Step 4: Windows ten will automatically activate the file history feature after selecting the drive.

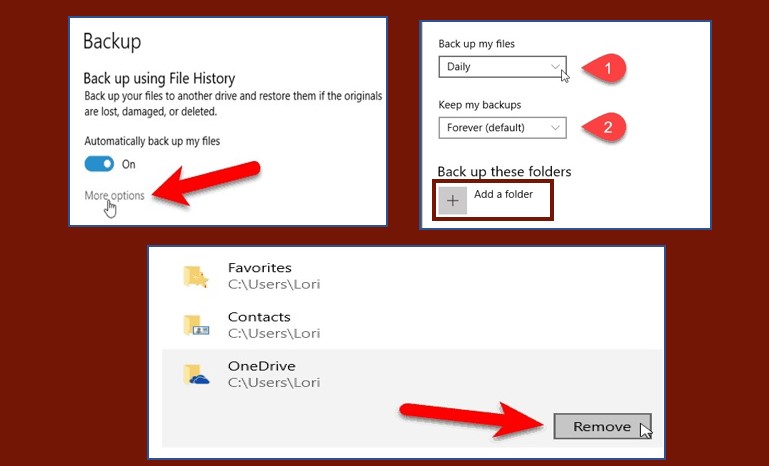
Note: If you want to customize the file history settings, click “More Option” under the Backup activation icon. On the screen, you can set how often you want your data to back up and quote how long you desire to activate the Backup procedure. In addition, users can also add their desired folders to the Backup list and remove them. To understand correctly, check out the given picture below.

2. Windows Backup and Restore Method On PC
Windows Backup and Restore feature is another method in Windows 10 to activate the Backup procedure. Explore several options in the Windows backup and restore feature to create a backup plan, such as system image backup, which usually gets a snapshot of the entire system. Another one is file backup which holds data in selected files and folders. Users can also customize the regular schedule regarding Backup procedures. Thus, it is one of the effective PC backup solutions in Windows 10.
Here you can also select the backup procedure duration, i.e., for how long you want to keep the folders in the Backup list or the specific duration to keep the Windows backup and restore feature activated. In addition, there is also an option to make a proper Backup schedule to sync your data, such as hourly, daily, or weekly updates. After customizing the settings, the Windows Backup and Restore feature will automatically creak backups for the files and folders you’ve selected for the Backup list.
Steps To Activate Windows Backup and Restore Feature
Perform the following steps according to guidelines and suggestions to activate the Windows backup and restore feature effectively.
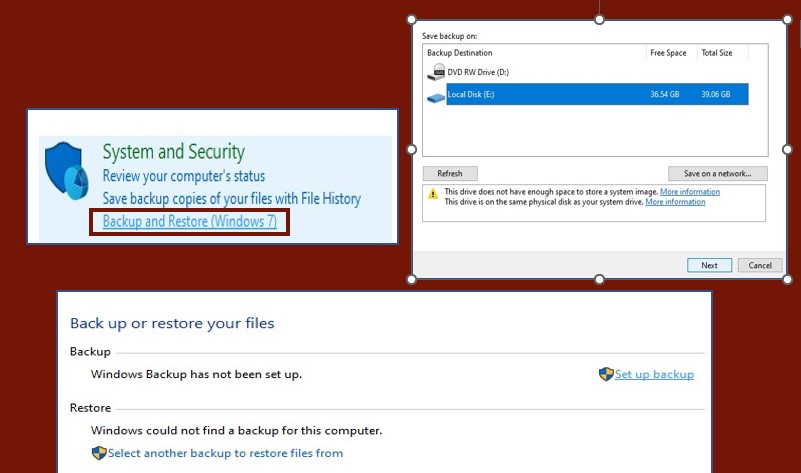
- Step 1: Click on Start Menu and Type “Control Panel” in the search bar of Windows 10. Click on Control Panel to open it.
- Step 2: There are different categories once the control panel is opened. Click on the “System and Security” option.
- Step 3: You will find the option “Backup and Restore (windows 7)” Click on it and look for Set up Backup to click.
- Step 4: Once you have clicked on the “Set up backup” option, you must choose the drive where you want to restore your files, such as an external hard drive, a USB drive, or a network location.
- Step 5: Select the files and folders you want to add to the Backup list, including different formats such as pictures, documents, videos, etc.
- Step 6: In the last step, save the settings. If you think you are done with the Backup and recovery plan in Windows 10, click “Save Settings and Run Backup,” The Backup procedure will begin for PC security and data protection.

Note: In case you lose your data, you can restore it with the help of this feature in Windows 10. Access and restore the files and folders from the Backup by opening the interface of Backup and Restore (Windows 7) and selecting “Restore my files. “Here, you can select the files and essential data you desire to restore. After this process, your files will be restored, and you will get access to them again.
3. Cloud-Based Backup Services in Windows 10
Backup is an appropriate method to make assessable steps for data protection and PC security. These are online PC backup solutions in Windows 10. You can easily create a local backup plan to secure your data.
So, there is a chance to minimize data loss with the help of a cloud-based Backup plan. Cloud-based services provide a software application installed on the PC to automatically secure the data and activate the Backup process after signing up or creating an account.

Cloud-based backup services are usually provided with Google Drive, Dropbox, and many other famous platforms. Google Paste backup program usually comes up with Google Photos to back up images and videos after every repeated interval and Google Drive or google docs to save essential documents. Hence, you can use such services which are completely secure and trustworthy.
Read More: Best Windows File Explorer Alternatives
Advantages of Using Cloud-Based Backup Services
Using cloud-based backup services will help you realize how beneficial it is and how this backup and recovery plan differs from other methods. Thus, let’s check the advantages of using a cloud-based Backup plan to secure your essential data.
1. Provide Remote Access
Users can enjoy remote access to their Backup files from everywhere with the help of the internet and providing the account details that hold data. So, there is no need to carry your PC everywhere to keep the necessary data.
2. Scalability
There is a scalability option to adjust the scale up and down to meet the size of files or documents related to business. Here, you can back up your data in every size and format.
3. Automatic Backup
Users can customize the backup schedule in cloud-based software. So, you don’t have to be worried about manual Backup; select the folders and schedule the Backup procedure; you only need access to the internet. If you face an internet error, there will be a backup notification to inform or remind you about a backup plan.
4. Security For Data Protection
Cloud-based backup service providing software such as Google ensures to keep your data secure from any unauthorized access. It also provides password protection by offering different account verification methods.
Thus, cable-based services have multiple benefits for a data plan, making it unique and different from other Pc Backup solutions in Windows 10.
5. Network Attached Storage (NAS)
Network-attached storage is a solution that allows users to store and assess their data over a network. These devices are typically small, but this is an effective method for restoring data and other recovery purposes.
NAS is a new or odd term for primary computer users. Still, today you’ll learn how useful it is and how it can be helpful for you to restore your data in a secure place without being afraid of sudden data loss due to any hardware failure or unauthorized access.
Steps To Use NAS As a Method for Data Backup Recovery Plan
The followings are the steps to follow and begin the Backup procedure with the help of NAS.
- Step 1: First, connect the NAS device to the home Office network that you use with the help of an Ethernet cable. The settings after the device might need to be adjusted according to the manufacturer’s instructions.
- Step 2: Set up your device as a network share because this will allow you to access the device and store files on it. In case you need any guidance regarding the setting or optimization of the device, you are referred to the manufacturer’s documentation for a better understanding.
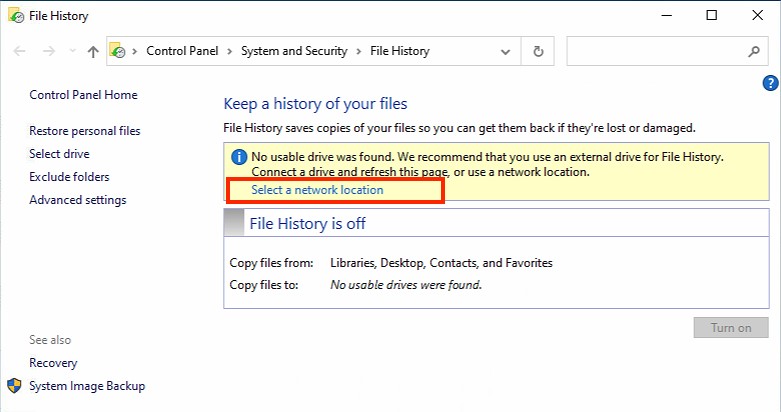
- Step 3: Now, click the Windows Start button on your screen and keyboard. Type “File History” and click the File History Settings option.
- Step 4: Select a drive that is given on the screen by clicking on “Select a Drive .”Choose the NAS device as a Backup location and click “OK.”
- Step 5: Activate file history by toggling the “File History” switch to “On,” and the Backup procedure will be activated.

With the help of a NAS network, you can quickly restore your data and keep your PC protected in case of any inconvenient action that might occur on your PC. There are also chances to face cyber-attacks in Windows 10.
Conclusion
Data backup and recovery plans are vital in protecting and safeguarding your data against losing or damaging your PC. In Windows 10, users can experience various backup and recovery options in the background, such as cloud backup services, NAS devices, and build Backup and restore features. These are the most appropriate methods that can be used to transfer data to secure it in a safe location. We hope you find this article beneficial; now, you can quickly get a backup plan for your informative data by following the given methods in this article along with their steps.

