If you run out of storage space and don’t want to purchase a new hard drive to extend storage, partitioning a hard drive is the way out. In Windows 10, you can partition a drive to easily store files and other data in the desired hard drive. Partitioning is a complex process and isn’t for everyone. You need a good knowledge of computers to do it correctly. If anything goes wrong in the partitioning, you will lose all the data and have to format the hard drive. This partitioning guide allows you to partition a C drive without formatting easily.
What is Partitioning?
Partitioning is a complex computer process through which a physical hard disk drive is divided into several parts. Partitioning is done to shrink or extend the storage of the drive. You can also manage everything from the partition size to location and label, etc., through this process.
Why partition a Hard Drive?
If you are new to partitioning, it is essential to understand its benefits below.
- You can run more than one operating system on the same system without needing a separate hard drive for each system.
- Take data organization to a new level with multiple partitions of the same drive. Organize files into various partitions according to their categories.
- Reduce the risk of losing important data and files, especially if the operating system is corrupted. Don’t worry about installing a new operating system because all your data is stored in another partition.
Guide to Partition C Drive
Many users prefer third-party partitioning tools, but the built-in partitioning tool in Windows 10 can get the job done too. This tool is called Disk Management, which enables users to partition the hard drive into desired sizes. The second method for partitioning the C drive is a command prompt command. A step-by-step partitioning guide is given below.
Using Disk Management
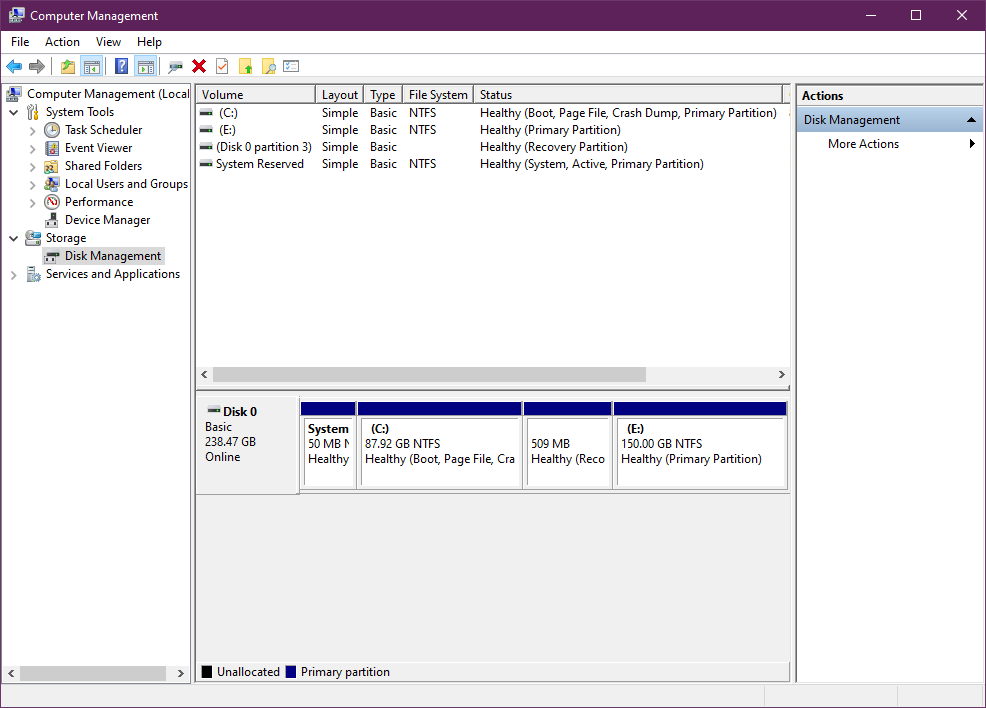
Before you try to partition the hard drive, check the total storage capacity and the available storage to calculate the size of the new partition. To check the hard disk storage, follow these steps.
- Open “Run Dialogue” by pressing W + R and Type “compmgmt. msc” to access the Computer management console.
- From the side panel, click on the storage and Click on Disk management.
- Wait for a few seconds to load the screen.

You can now see everything about the hard drive, such as current partitions, the total size of the hard drive, the file system, and the partition’s status. You can also repeat this step in the future to check the health of the hard drive. After determining the size of the new partition, follow these steps.

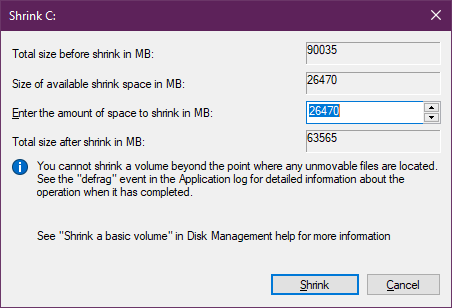
- Select the desired partition, right-click on it, and Click on Shrink Volume from the options menu.
This process will take a minute or two, and once it’s finished, the tool will show the available shrink space so you can partition the C drive according to your needs. After entering the amount of shrink space, press the Shrink button and let the tool run. By partitioning with the disk management tool, don’t worry about any data loss because this doesn’t require formatting. You can also create a new partition using the same disk management tool.

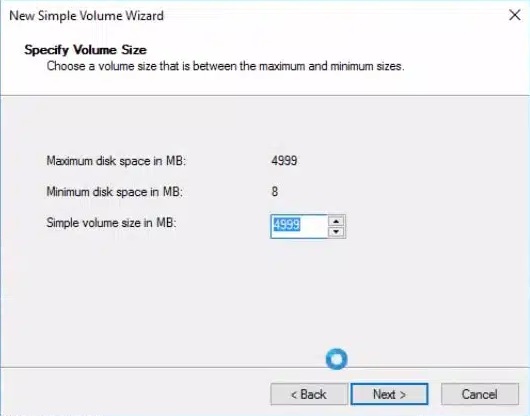
- Click on the “unallocated” from the bottom, Right-click to open the options menu, and Select “New simple volume.”
- Enter the new and the file format of your new partition and the partition size in MBs.

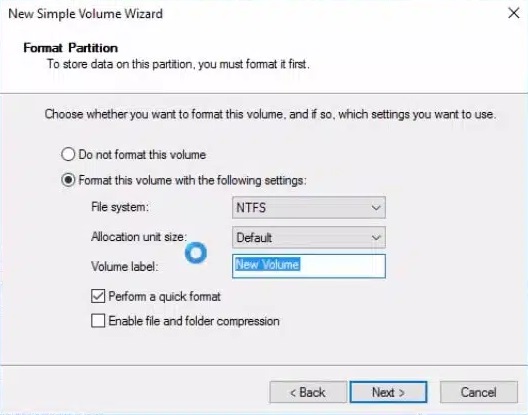
Make sure to enter the correct size only so you don’t get an error message and everything goes smoothly. In the next step, you must choose the formatting details so the system can format the newly created partition. You can select the file system, volume label, and allocation unit size here.
If you don’t know about formatting, leave the allocation unit size to default and select NTFS as the file system. You can perform a quick format to save time, but the second option is better, although it takes some time. The quick format option works best for new partitions, so don’t worry.

