Remote desktop is an excellent feature of Windows, but as with all the other features, it can also encounter some errors. One of the most common errors of remote desktops is the black screen error that occurs when you try to connect to another device. There are many reasons why the remote desktop has a black screen appears. Below are the methods to deal with this remote desktop error and enjoy a seamless connection remotely.
What is a Remote Desktop?
Remote desktop enables users to enjoy applications and Windows desktops remotely anywhere from around the globe. It uses the remote desktop protocol to connect the two desktops. The feature has been available for quite some time now in Windows, but it was previously known as terminal services.
Why the Remote Desktop Black Screen Error Appears?
Before you move to troubleshoot the remote desktop error, it is essential to find out the actual cause of this error. By learning the cause, you can solve this issue once and for all.
- The most common cause of the remote desktop black screen error is the outdated version of the operating system.
- A black screen can appear if you have recently changed the remote desktop settings.
- Changing the graphics card settings and settings of its drivers can cause the black screen error.
- Changing the operating system’s settings can also lead to a black screen error on the remote desktop.
Read More: How to Restore a Missing Sleep Option in Windows 10
Methods to Fix the Remote Desktop Black Screen
Here’s what you should do if you encounter a black screen when trying to establish a remote connection using the Windows remote desktop feature.
1. Adjust the screen resolution
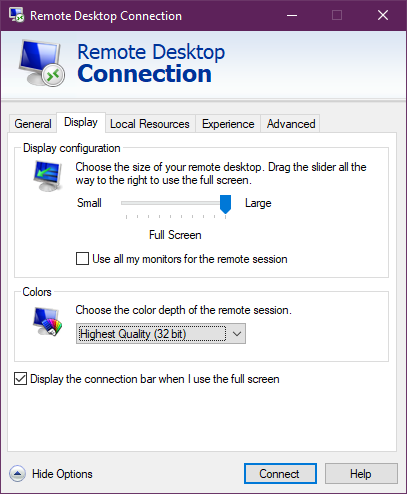
We are not talking about the screen resolution of the display but instead about the resolution of the remote desktop. You can change the screen resolution when you go to the remote desktop app. Incorrect screen resolution will cause a blur screen or a black screen error. You can avoid the error due to this reason by adjusting the screen resolution.
- Open the Remote desktop connection app.
- Click on show options from the bottom.
- Go to the Display tab.
- Use the slider control to adjust the screen resolution.
You can also change the color depth of the remote connection from the same menu. Once you have adjusted the settings, apply them and check the remote desktop for errors.
2. Disable the bitmap caching
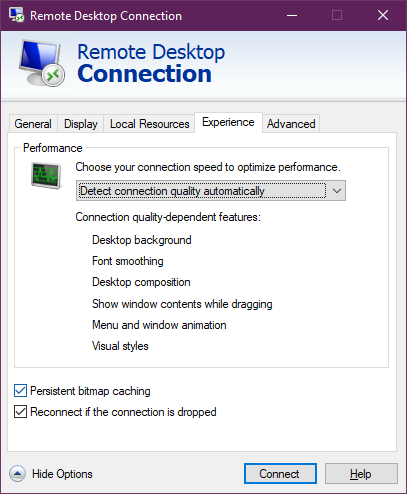
Bitmap caching saves all the images and other resources on the client’s computer to be accessed quickly. This is a good feature but can lead to a black screen error on the remote desktop. To resolve the black screen error, you can disable it from the remote desktop settings.
- Open remote desktop connection app
- Click on Show options
- Go to the Experience tab
- Uncheck the box that states “Persistent bitmap caching”
- Connect remotely and check for the error
Read More: How to Fix Cloudflare’s Error 1020: Access Denied
3. Turn off the fast startup

You can cut short the time your computer takes to boot up by enabling the fast startup feature, but it can cause many errors due to cache and file corruption. The fast startup can also cause the remote desktop black screen error, so disable it and try again. Here are the steps to disable it from the Windows settings
- Go to Windows Settings
- Go to Power options
- Click on “Choose what power buttons do” from the side
- From the bottom, uncheck the fast startup box
- Saves changes and restarts the computer
4. Start remote desktop services
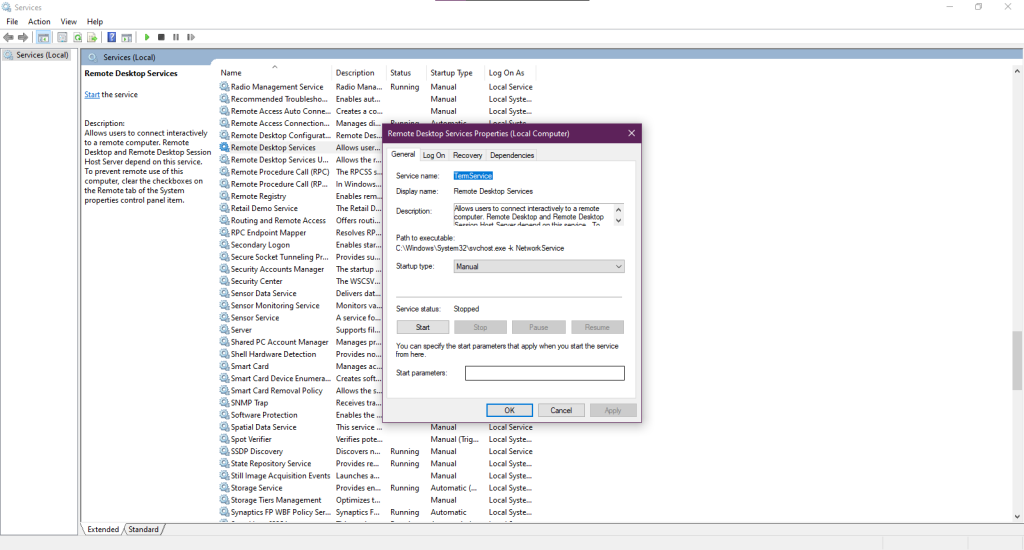
Sometimes, remote desktop services are stopped, and the option that automatically enables them is not on, which leads to the black screen error. While troubleshooting this error, check this service and set it to start automatically by following these steps.
- Open the Services app
- Find Remote Desktop services
- Double Click to open it
- From the Service Status section, click on Start
- Change the Startup type to Automatic
- Apply Settings and restart the computer
5. Change Remote desktop performance settings
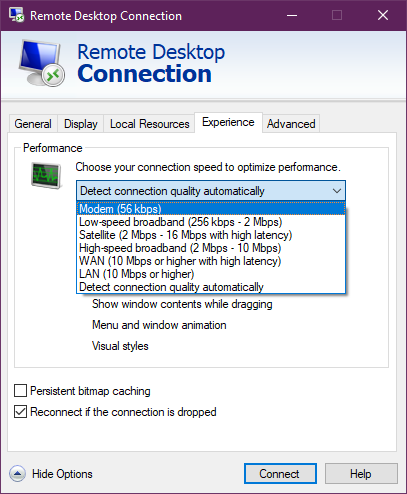
The black screen can also occur due to the speed and the quality of the remote desktop connection. To increase the quality of the connection, you can make changes in the performance settings menu.
Read More: How To Configure Wake-On LAN on Windows 10?
Check the performance settings menu for the current settings and try different changes to determine which works best for you. By default, the performance settings for remote desktops are optimized according to your computer’s specs, but changing them might solve this problem. Change the performance settings by following these steps.
- Open the Remote desktop connection app.
- Click on Show options from the bottom.
- Go to the experience tab.
- Choose the Connection speed.
Select the connection speed accordingly, but if you are unsure about the connection speed, select the option so the app automatically detects the speed and changes settings. Once you have selected the speed, check or uncheck the boxes to enable or disable the quality features.
- Apply the settings and restart the computer
6. Check drivers
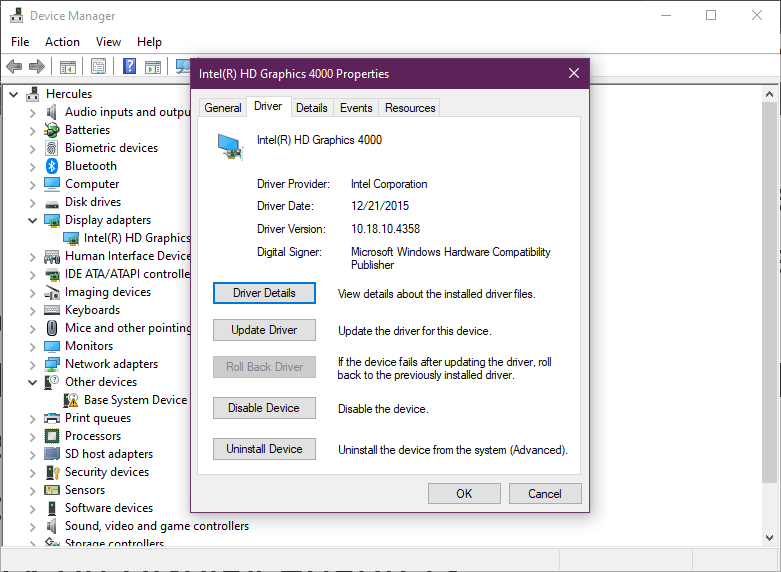
Graphics cards aren’t required for remote desktops, but if you have installed them, it can cause the black screen error. Graphics card drivers need to be updated from time to time. To check the GPU drivers and update them, follow these steps. Before updating the drivers, create a restore point to restore the computer if anything goes wrong.
- Go to Device Manager
- Click on Display Adapters
- Double Click on the available adapters
- Go to the Drivers tab
- Tap on Update Drivers
- Apply Changes and restart the computer
7. Edit group policy
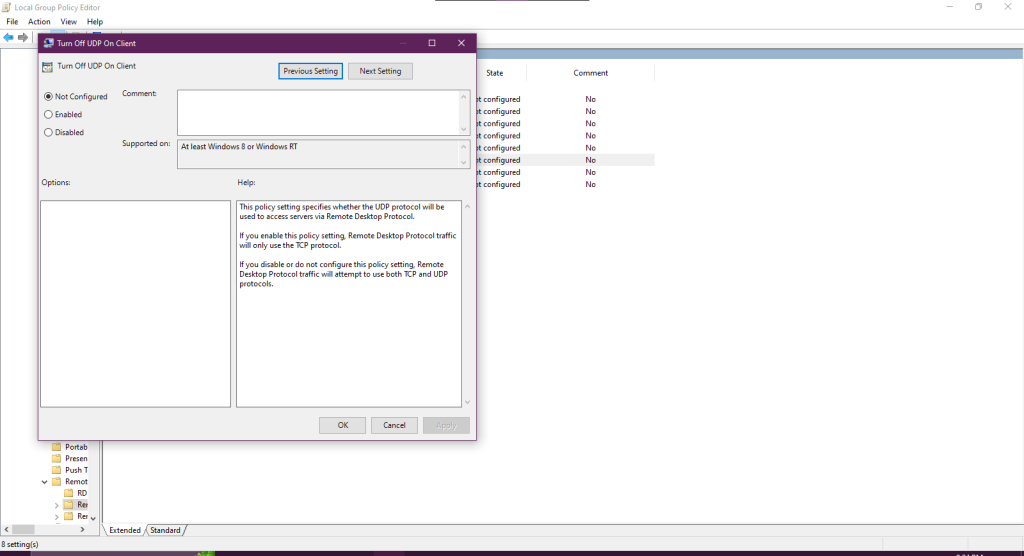
You can use the group policy editor to change the values of the remote desktop connection client and the WDDM graphics display driver. Guides to edit both group policies are given below.
For the Client Machine
- Open group policy editor app
- Open Computer Configuration
- Open Administrative templates
- Open Windows components
- Open Remote desktop services
- Open Remote desktop connection client
- Search “Turn off UDP on client” and open it
- Enable it and Apply Settings
Once you have enabled this group policy service, open the command prompt and enter “gpupdate /force” to apply new changes.
For the Remote machine
- Open Group policy editor
- Open Computer Configuration
- Open Administrative templates
- Open Windows components
- Open Remote desktop services
- Open Desktop session host
- Search “Use WDDM graphics display driver for Remote Desktop Connections” and open it
- Disable it and apply new settings
8. Update the Computer
As a last step, you should try updating the operating system, as the remote desktop connection app is a Microsoft app. To avoid the hassle of manually checking for new updates and installing them, enable the auto-update option.

