Windows 11 is better than ever, but it still has a lot of room for customization. If you are looking for methods to boost your efficiency and productivity, you will surely have to customize Windows 11. For this purpose, here are some of the best tips and tricks that you can try to customize your computer. These tips will cover both new as well as old features.
1. Change Startup apps settings
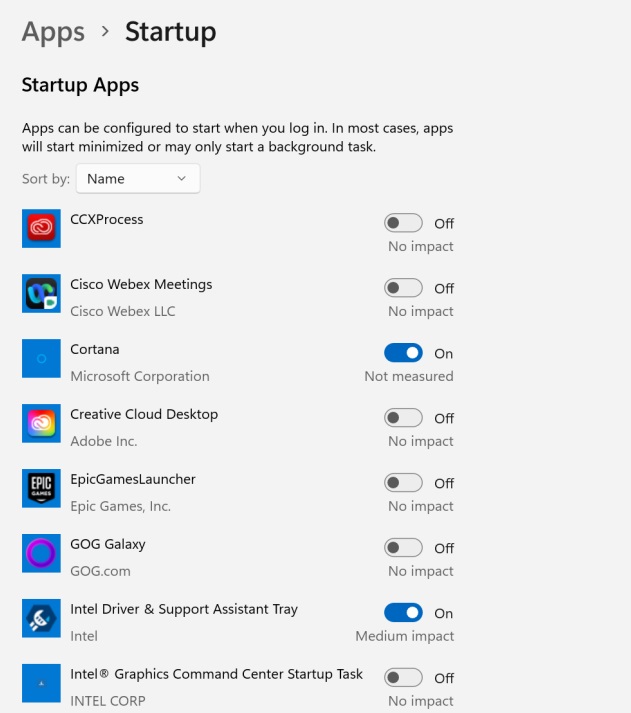
Startup apps automatically load when your pc boots and dozens of apps can sometimes appear in the startup apps list. In such cases, your computer will become very slow and take much time to load. The best method to deal with these unnecessary apps is by disabling them from the startup apps list. Follow these steps to disable startup apps.
- Go to Windows 11 Settings
- Click on Apps
- Click on Startup
- Enable or disable the desired apps
Once you have disabled apps from the startup list, they won’t automatically load at the boot time. Beware of disabling essential apps such as Windows and antivirus services, etc.
Read More: Windows 10 Guide: How to fix the 0xA00F4244 Error?
2. Change the text and icon size
This great feature in Windows 11 enables you to take care of your eyesight because viewing text in a small font for too long can result in eye problems. To change your computer’s text and icon size, follow these steps.
- Go to Windows 11 Settings.
- Go to the System section.
- Click on Display.
- Find the Scale section in Scale & Layout.
- Change the percentage to the desired value.
There are no exact text and icon size settings, so the best method is to experiment with various options according to the display size. Altering these settings will change the size of icons, window sizes, text sizes, etc. To change the text size, go to the Accessibility folder in Windows 11 settings.
3. Customize the Taskbar
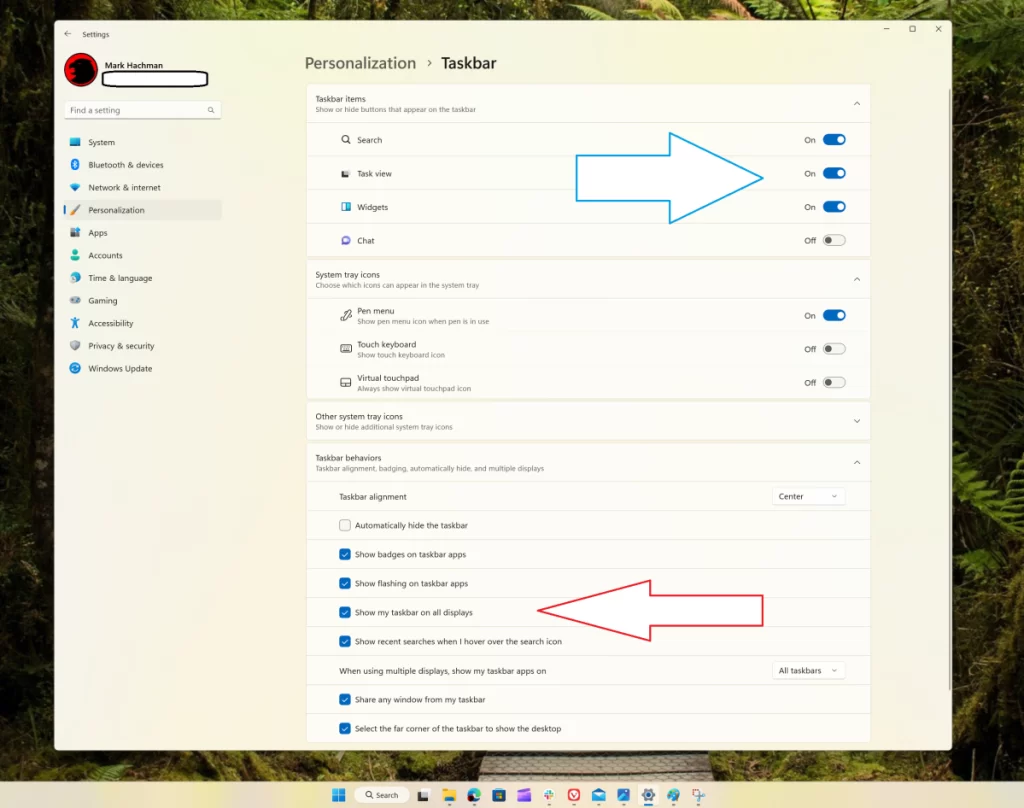
Windows 11 features a customizable taskbar to take customization to a new level. Here are the steps to customize the taskbar according to your needs.
- Go to Windows 11 Settings.
- Go to the Personalization folder.
- Find the Taskbar items menu.
- Enable or disable items.
Read More: What is Wsappx and How to Fix Its High CPU Usage?
More customization options for the task are available in the bottom “Taskbar behaviors” section. Different settings are available such as taskbar alignment, badges, flashings, the search icon, etc. Disabling apps makes the taskbar less crowdy and increases your productivity to some extent.
4. Optimize the Start menu
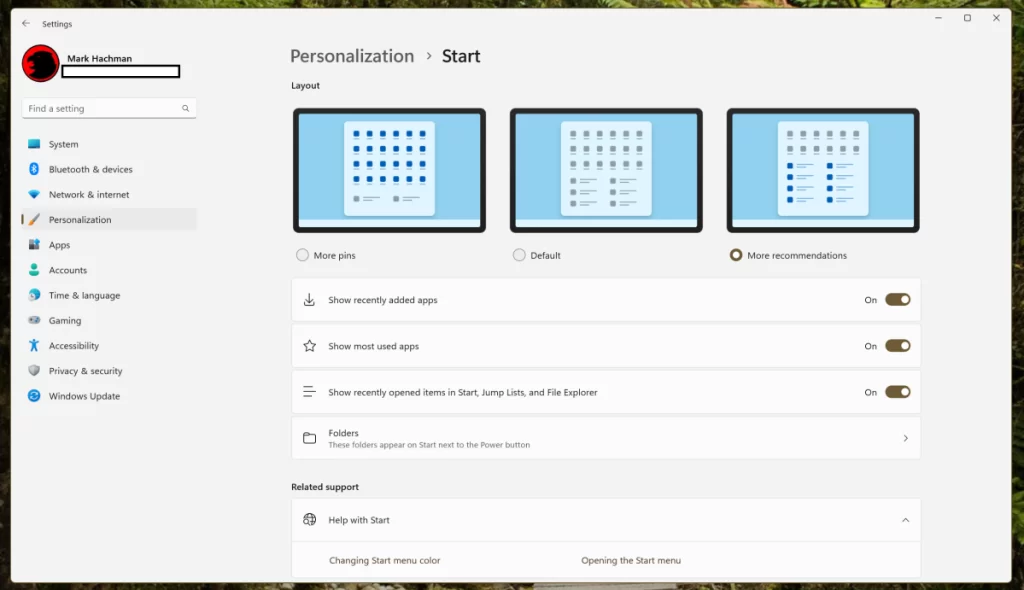
Like the taskbar, settings are available in Windows 11, which allows you to optimize the start menu. With the right start menu settings, you can pick up the work right from where you left off to save time and increase efficiency. Follow these steps to optimize the start menu.
- Go to Windows 11 Settings
- Go to the Personalization menu
- Click on Start
In this menu, you can change the start menu layout to view files and apps according to your needs. Disable or enable options to view recently viewed and added apps at a glance. There is a separate Folder menu through which you can add new icons to the Start menu and make them appear at the desired place.
5. Avoid the Start menu
If you don’t like the Start menu in Windows 11, don’t worry, as you are not alone. To address this situation, Windows 11 came up with an option through which you can avoid the start menu. The start menu lets users search for their favorite apps and files quickly, but you can press the Windows key, type the app name, and search for it. You will have to remember the number of an app on the start menu to access it quickly. Now that you remember the number press the Windows key and the number of the app to open the app quickly.
6. Copy files using the File explorer tabs
Earlier, users had to navigate through many folders to find a file and then copy it before continuing to search for the destination so they could paste the file. Now it has changed thanks to the Windows 11 2022 update.
After the update, the file explorer now features a tab option. You can now create new tabs inside the same file explorer window by pressing the “+” key. This way, you can open both folders simultaneously and copy the file from one tab to paste it to the other. This feature is pretty cool and will save you time.
7. Use the Game mode
For gaming on a computer, you need more processing power, and the game mode is the best option for getting all your computer’s power. Once the game mode is enabled, Windows won’t be able to update, and all the background processes will be disabled. To enable the game mode in Windows 11, follow these steps.
- Go to Windows 11 Settings.
- Go to gaming and turn on the Game Mode.
Read More: 10 Ways to Fix if Your PC Won’t Turn On
You can follow the same method to turn off the game mode because keeping it on means the operating system won’t be updated.
8. Configure Multiple Displays

Thankfully, you can use multiple Displays in Windows 11, and this is a must-have, especially for those who work. By using multiple displays, they can increase their productivity. Configuration of multiple displays is accessible in the latest operating system from the house of Microsoft. You should select the arrangement of displays and choose the primary display. Here are the steps to use multiple displays.
- Go to Windows 11 Settings.
- Go to System.
- Go to Display.
You can change the layout of the displays by dragging the desired display and dropping it at the correct position. Use the identify option to automatically check for new displays and add them to the system. Moreover, you can extend the display to other screens.
In Windows 10 or previous versions of Windows, when you disconnect a display from your laptop, the layout of the display is changed. Now, you can lock the display layout, so it doesn’t change even when it disconnects.
9. Preview Pane
Finding a file in Windows can be difficult sometimes, and even if you try file explorer to find it, you can’t. In such cases, the preview pane in Windows 11 comes handy. The preview pane shows text files, PDFs, documents, images, and many other file types. You will first have to enable the preview pane to view it. You can adjust the preview pane size to view it in detail.
Read More: Windows 10 Randomly Black Screen Errors – 15 Ways to Fix
10. Use Do Not Disturb
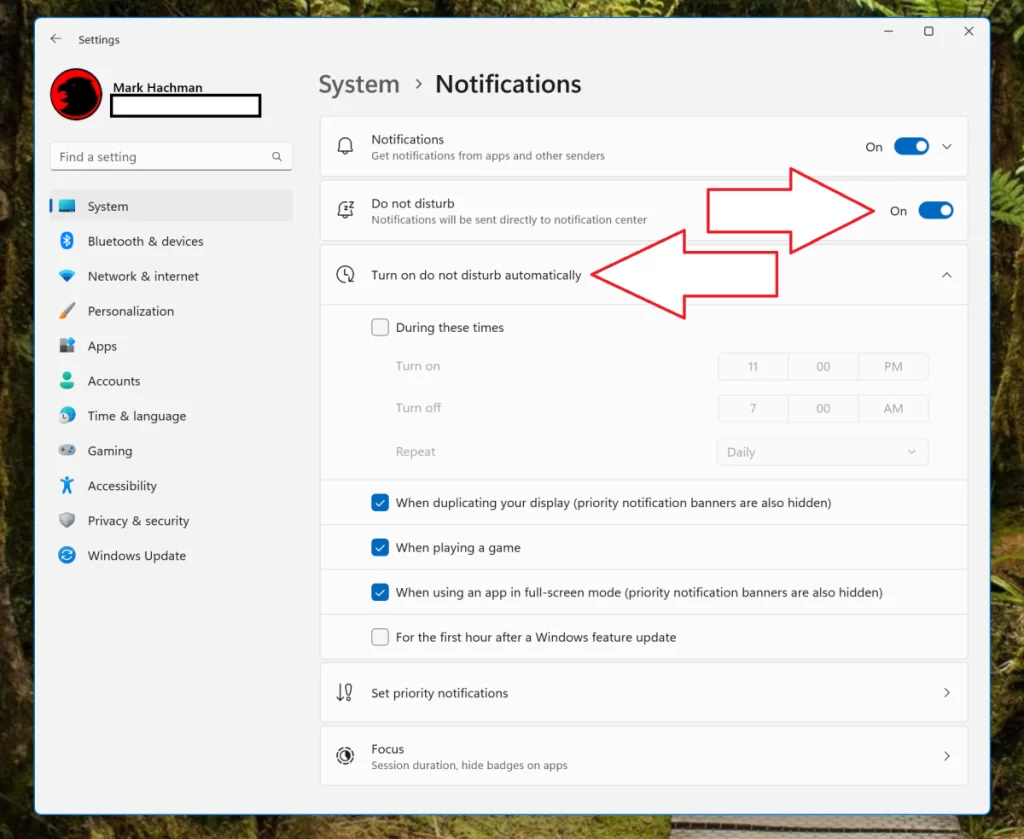
There is a focus mode in Windows that automatically turns off all the notifications for now, and you can enjoy a playlist of songs while doing your work. The do not disturb mode differs from the focus mode in Windows 11. With this mode, all the notifications will be present in the notification section of the action center, but you won’t be disturbed by them. To enable the do not disturb mode, follow these steps.
- Go to Windows 11 Settings
- Go to Notifications
- Enable the “Do not disturb.”
With the scheduling of the do not disturb mode, it will be enabled and disabled automatically. This way, you don’t have to enable it every time. This is handy for those who work as they don’t have to worry about notifications and can complete their work on time.

