Once you are done with the basics of WordPress, the first thing that you want to do is to customize the design of the theme. This isn’t simple because one wrong move and the original theme of the website will be damaged. To avoid this risk, WordPress features child themes. For those who are new to WordPress, here is the ultimate child theme guide so you can understand them and learn each step to create a new child theme for your website. Before digging more about the child themes, it is important to understand what is a parent theme because they are connected.
What is a Parent Theme?
A parent theme, on the other hand, is a complete theme that includes everything from theme assets to template files that WordPress requires for working. Except for the child themes, every theme you install on WordPress is a parent theme.
What is a Child Theme?
In WordPress, you can change the small visual details of your website without altering the overall functionalities and the looks of the original theme. Everything from looks to functions of the child theme is inherited from the parent theme. Child themes are used for experimentation purposes, and you can always revert back to the parent theme if anything goes wrong. To use a child theme on your website, you first have to install a parent theme. Here are some basic functions of a child theme.
- All the modifications to child themes are replicable and portable because these files are saved in a separate folder.
- All the customization you have done to a child theme won’t affect the parent theme.
- Customize the parent theme without the risk of losing previous modifications at all.
- You can try new things for the parent theme.
- You can save a lot of themes and create new themes without writing the whole code again.
Read More: How to Fix Cloudflare’s Error 1020: Access Denied
How to Create a Child Theme?
To create a WordPress child theme, you need knowledge of CSS, PHP, and HTML. You also have to choose a parent theme for the child theme to work. If you have everything, it is time to start building your child’s theme. You can avoid the hassle of creating your child theme by automatically generating a child theme using a WordPress plugin. Many free child theme plugins are Child theme wizard, WPS child theme generator, WP child theme generator, etc.
1. Create a Theme Folder

Firstly, create a separate folder to save all the assets and the template files of your child theme. You can’t save the template files of the child theme in the parent theme folder. When it comes to naming this child theme folder, choose a name similar to the parent theme and add “child” at the end to remember it.
2. Create a Stylesheet

The next step is to create a new file named “style.css” and save it in the child theme folder. This file will feature everything from declarations to the CSS rules for your new child theme. To create this file, open any text editor or code editor. Add a header comment in this stylesheet file that includes the basic information about the child theme and the parent theme. Without this comment, a stylesheet won’t work. The next step is to add the two elements to the theme, which are given below.
- Theme name – It is the name of your new child theme.
- Template – It is the name of the folder where the parent theme is saved.
Besides these two elements, all the other details about the theme are optional. You can add the name of the author, tags, version, and description of the theme. If you are creating a child theme to sell, you should add these details to make it look professional. Below is an example of a header comment for the Twenty Twenty-One child theme.
Theme Name: HubSpot Twenty Twenty-One
Theme URI: https://example.com/twenty-twenty-one-child/
Description: Twenty Twenty-One Child Theme
Author: Anna Fitzgerald
Author URI: https://example.com
Template: twentytwentyone
Version: 1.0.0
License: GNU General Public License v2 or later
License URI: http://www.gnu.org/licenses/gpl-2.0.html
Tags: two-column, responsive-layout
Text Domain: twentytwentyonechild
3. Enqueue the Style Sheets
After creating a stylesheet for the child theme, it is time to enqueue the stylesheet of the parent theme and the child theme. This is to make sure that the style of the child theme is similar to the parent theme. The stylesheet of the child theme will also load before the stylesheet of the parent theme. Here is the code to enqueue both stylesheets.
<?php
add_action( ‘wp_enqueue_scripts’, ‘hubspot_blog_theme_enqueue_styles’ );
function hubspot_blog_theme_enqueue_styles() {
wp_enqueue_style( ‘parent-style’, get_template_directory_uri() . ‘/style.css’ );
}
?>
In case this code doesn’t work for your themes, check the WordPress codex. Mostly, this code doesn’t work when the coding of your theme is different or if it doesn’t follow the code conventions of WordPress.
Read More: How to Fix Security Certificate Errors?
4. Install the Child Theme
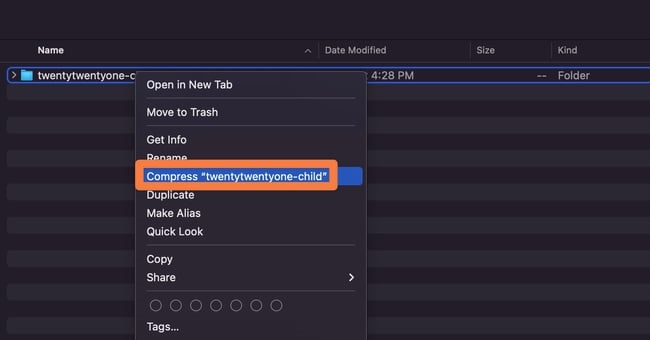
Go to the directory of the child theme. If you see “functions.css” and “style.css” files there, congratulations because you have created a basic child theme. You can now install and activate the child theme. To install this theme in WordPress, package the theme in the WordPress dashboard. Compress the folder that contains both files in a Zip extension. Once the theme folder is compressed, follow these steps.

- Go to the WordPress site.
- From the side panel, click on Appearance.
- Click on Themes.
- From the top, Click on Upload Themes and choose the file.
- Once the file is uploaded, click on “Install Now.”
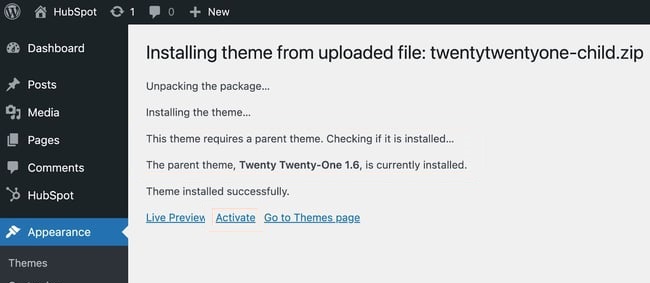
After the theme is installed in WordPress, you will be taken to a screen like the one given below.

Here, WordPress will check for the parent theme, which is twenty twenty-one themes in this case. If the theme is installed, you will be able to activate it. You can change the thumbnail of the theme by saving a new image in “png” or “jpg” format in the child theme folder.
How to Customize the Child Theme?
Creating a child theme was just the start. Now you have a child theme that looks just like the parent theme. The next thing that you will want to do is to customize it. You can customize the child theme and use it to customize the parent theme. There are three methods to customize the child theme, which are given below.
- Custom template files.
- Custom CSS.
- Code snippets in functions.php.
1. Custom template files
WordPress enables users to create child themes and use them to modify templates of their parent themes. This method is mostly used in order to customize templates for separate blog posts. Creating custom template files is an advanced method and requires a good knowledge of both PHP and HTML. WordPress features a separate hierarchy for templates, and you have to understand it completely to create custom template files. As an alternative to understanding this stuff, you can simply use a visual builder to customize the theme. Here are the steps to edit a template file.
Read More: 10 Ways to Fix if Your PC Won’t Turn On
- Go to the parent theme folder and copy the template file.
- Paste the template file into the child theme folder.
- Edit the template file and save it in the child theme folder.
WordPress will search for the template file in both folders and use the file from the child theme folder. Make sure to check the changes in the staging environment to make necessary changes before applying the new template.
2. Custom CSS
Go to the child theme folder and find the “style.css” file to add CSS to it. This is one of the best methods to customize your child’s theme. With this method, you can change anything from the color scheme to padding and typography well as other design elements of the child theme. You should add these new code lines to the style file below the header comment.
3. Code snippets in functions.php.
The same thing goes for when you want to change the functions of the parent theme. You will have to edit the functions file in the child theme folder.

