WordPress offers great features to help admins and site owners manage their websites. One such feature is called post-scheduling. It lets you publish posts occasionally without having to come online. But sometimes, an error can occur due to which you miss a scheduled post. If this error has disrupted all your plans to draft and publish content on your website, it is time to deal with it once and for all. This article features the causes of the missed scheduled post error along with methods so you can troubleshoot it.
What is a Scheduled Post?
The scheduled post is a plugin in WordPress that enables users to set the date and time for a post, which will be published automatically. It is a default plugin of WordPress. This plugin works best for those who want flexibility in managing their website, as they don’t have to stay online all the time and can even set a schedule for publishing posts for weeks and months. This plugin is based on Cron, runs in the background, and checks the list for newly scheduled posts to publish them on time.
What is Missed Scheduled Post Error?
As the name says, the missed schedule post error occurs when a post isn’t published on time even though you had set the schedule. This error mostly occurs due to issues with Cron, which handles all the scheduling in WordPress. The missed schedule post error must be corrected first because it can lead to more publishing problems. But before moving to the troubleshooting methods, here are some reasons for this error.
- When setting up WordPress, you may have selected the wrong time zone; if this is the case, Cron won’t publish your posts on time.
- If the WordPress content, such as cache, isn’t updated for some time, this can lead to a Cron error.
- If the memory is too low, WordPress won’t publish scheduled posts.
How to get rid of the missed Scheduled Post Error?
Here are the five fixes that you can try for the missed schedule post error in WordPress.
1. Configure WordPress
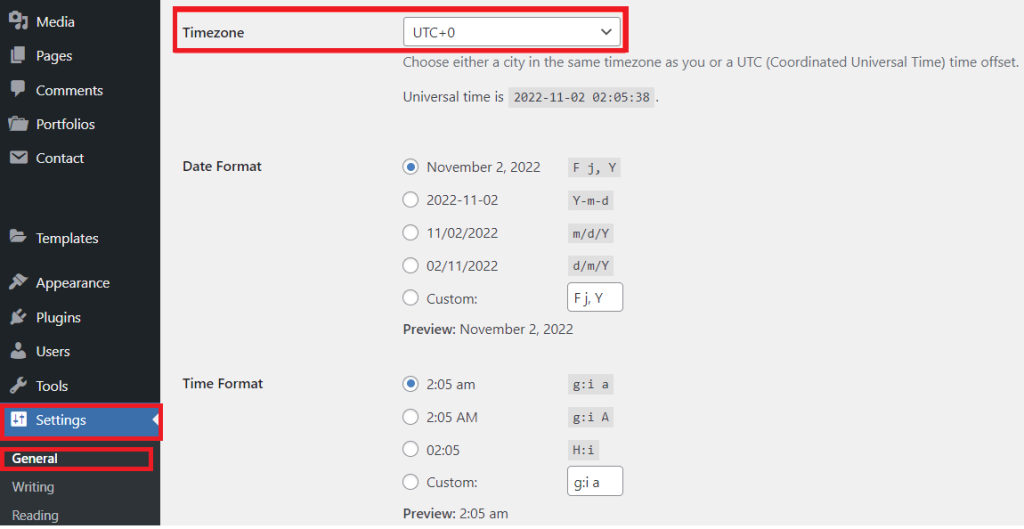
Selecting the wrong time zone can lead to a missed WordPress post error; you should go to the settings section to check it. Here are the steps to check and change the time zone from the Admin panel in WordPress.
- Go to the Admin page of the website.
- From the side panel, Click on Settings.
- Go to General Section.
- Find Timezone.
- Select your timezone.
- Apply Changes.
Once you have changed the timezone, revisit your website and schedule a new post to check whether the plugin is working like it should be.
2. Clear Cache
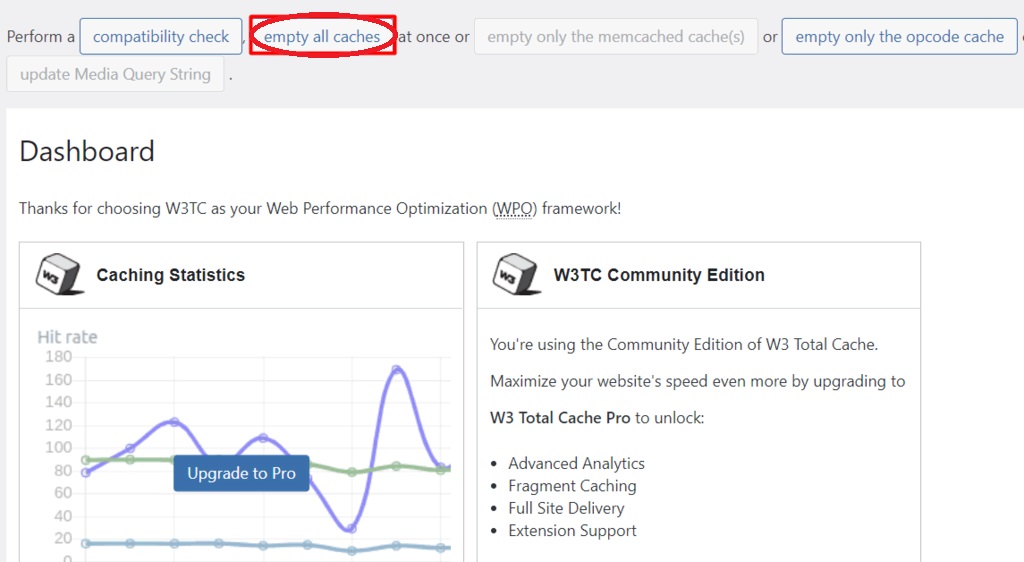
If the timezone for WordPress was correct or the error is still there even if you corrected it, the error can also be caused by an outdated cache. The cache is crucial as it helps your website to load fast, but when the cache isn’t up-to-date, the Cron won’t work perfectly, and scheduled posts won’t be published on time. To reset the cache in WordPress, follow these steps.
- Go to the WordPress admin panel.
- From the Side panel, click on Plugins.
- Type “W3 Total Cache” on the search bar.
- Install this plugin and activate it.
- Go to the Performance Section.
- Go to Dashboard.
- From the top, click on “empty all cache.”
This plugin is paid, but the free version enables you to delete the basic cache only, which is enough to eliminate this error.
3. Update the memory limit.
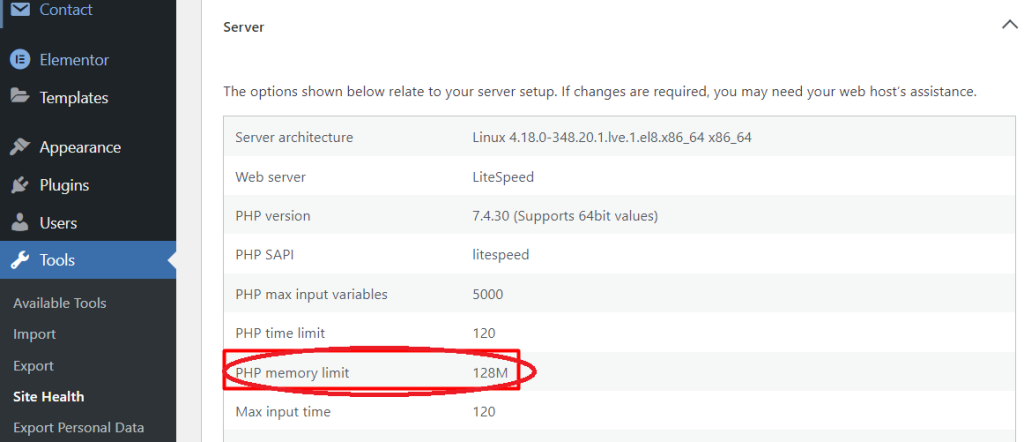
The memory limit of the server on which your website is running matters a lot, and if it runs out of memory, many errors will start to occur, including the missed schedule post error. You can upgrade the memory limit of the webserver to enjoy seamless scheduling and eliminate this error. WordPress currently uses PHP or the hypertext preprocessor as the main language for scripting, so you will have to check its memory as well.
- Go to the WordPress dashboard.
- Click on Tools from the side panel.
- Click on Site Health.
- Go to the Info section.
- Find Server Section.
- Check “PHP memory limit.”
The default memory limit of PHP is one hundred and twenty-eight megabytes. If you see the same value here, consider upgrading it to at least two hundred and fifty-six megabytes. You have to go to the hPanel to upgrade the memory limit and enjoy the plugin without any errors in the future.
- Go to Hosting and click on Manage.
- Go to Files and tap the file manager.
- Find the public-html folder and open it.
- Look for the “wp-config.php” file and open it.
- Copy “define(‘WP_MEMORY_LIMIT’, ‘256M’);” and paste it in the file.
- Save the file.
You will have to paste this line of PHP code in the file just before the message that states, “That’s all, stop editing! Happy publishing.”
4. Use a third-party plugin.
As you know that the missed schedule post error is pretty common with WordPress, and many plugins are available that you can use to deal with it. Below are the two best plugins that you can use for this purpose.
- Scheduled post trigger plugin – This plugin works when a user visits your website. It will check the list of scheduled posts, and if the WordPress Cron has missed a scheduled post, it will publish them in the first place. This plugin works best for websites with high traffic only because it requires visitors to work.
- Missed scheduled posts publisher plugin – This plugin is for websites with low traffic because it doesn’t require visitors to work. It automatically checks the list of scheduled posts every fifteen minutes. In case Cron has missed a post, it will be published by this plugin.
5. Replace the Cron server
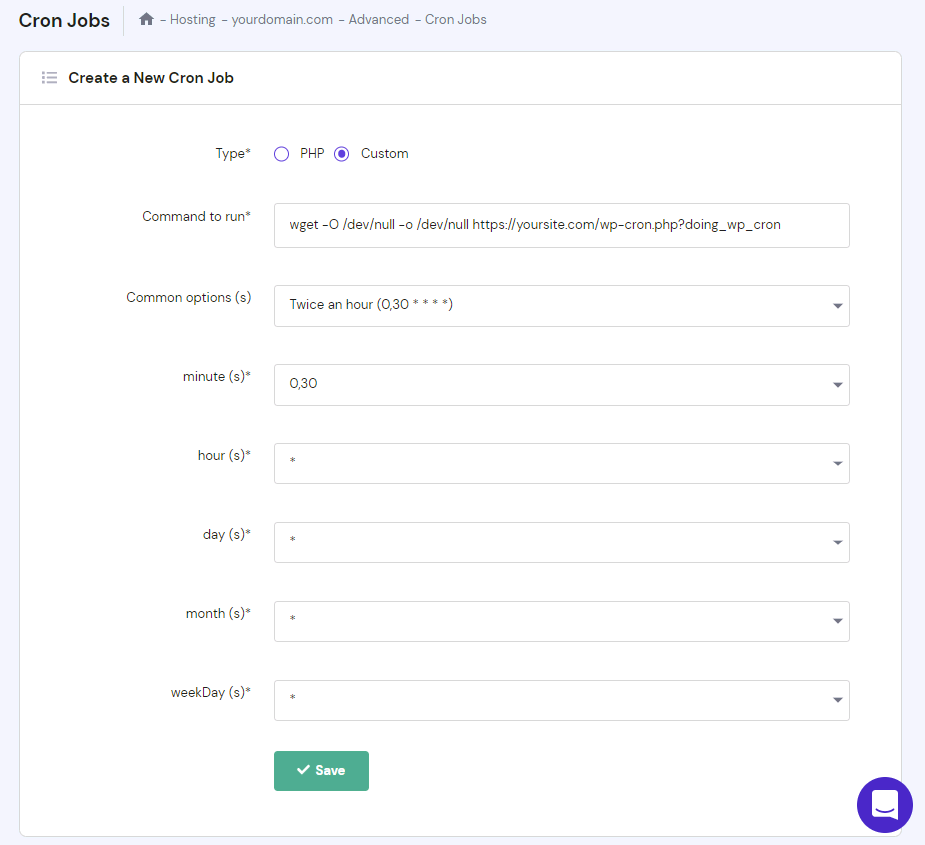
Replacing the Cron server is a pretty advanced step, so this should be the last resort when the problem is still there after trying all these methods. The WordPress version of the Cron plugin works when a visitor visits your website, so the missed post error can occur easily when there is no visitor. After the replacement, the new server will publish the posts when the timer ends. Here are the steps to replace the Cron server from the hPanel. Before you set the server-side Cron, you have to disable the WordPress version of Cron.
- Go to File Manager and go to the root folder.
- Open the “wp-config.php” file.
- Copy “define(‘DISABLE_WP_CRON’, true);” and paste it in the file.
- Save the file.
You can paste the line of code before the “That’s all, stop editing!” message in the PHP file. Once the WordPress Cron is disabled, you can set the server, Cron.
- Go to Advanced Section and Go to Cron Jobs.
- Open the Run box and select Custom.
- Copy “ wget -O /dev/null -o /dev/null https://yoursite.com/wp-cron.php?doing_wp_cron” and paste it into the Run box.
You have to replace “yoursite.com” with the web address of your website before pressing enter.
- Select the desired common option and Save.
After this, the Cron server will be replaced, and the list will be automatically checked based on the time you selected in the common options.

