For web designers, testing is essential as it will highlight all the bugs and errors in their code so they can remove them and make the website good to go. Testing on the local server is the best option but creating a local server on a Windows 10 computer is difficult. This is where XAMPP kicks in as it is a free solution through which you developers can create a local server environment. Setting the XAMPP on Windows can be a headache for many developers. This is where the XAMPP installation guide kicks in as it features a step-by-step explanation so they can install it without getting any errors.
What is XAMPP?
XAMPP is a free open-source program that features everything from command-line executables to modules like PHP, Perl, Apache server, MariaDB, etc., and the distribution of Apache so developers can create a local server. XAMPP sets developers free from remembering commands that are essential for all programming languages. It features a separate control panel through which developers can manage all the components.
Read More: How to Create a Child Theme in WordPress?
In any development project, Perl is the programming language while PHP is used for backend scripting. MariaDB is a database for web development and it is based on the MYSQL language. The X in XAMPP stands for cross-platforms while the A stands for Apache and the M means MYSQL. The two Ps means Perl and PHP. Below are some benefits of using XAMPP.
- Free and Open Source
- Available for Mac, Windows, and Linux
- Manage configuration settings
- Check the security status of the site
- Deal with administrative tasks
Guide to installing XAMPP
Here are the steps to download and install XAMPP and use it to save your time and effort in testing your projects.
1. Download XAMPP

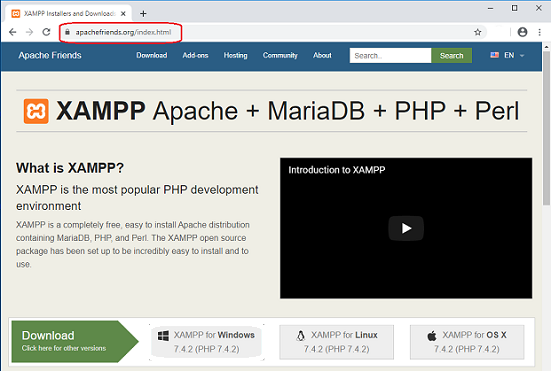
For the first step, go to the official website of Apache and download XAMPP. The website features all the versions of XAMPP for different platforms such as Windows, Linux, and Mac OS. Choose the right operating system and the latest version in order to download it. Once it’s downloaded, the next step is to install it.
2. Install XAMPP
Go to the folder where the XAMPP setup file is downloaded and double-click on it to open it. Follow these steps and finish the XAMPP installation.
- On the first screen, Click on Next
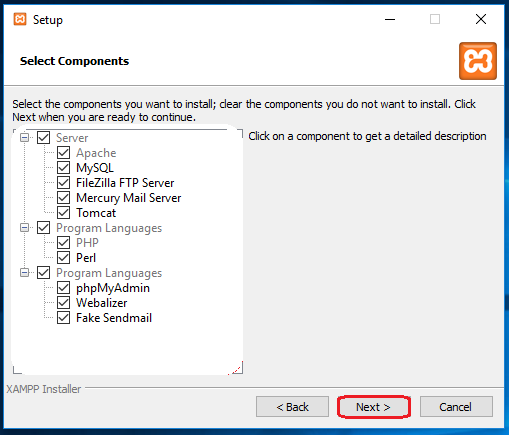
- Select Components and Click on Next

Here, you can select the desired server and program languages to move to the next step. By default, all the options will be selected. This option is to make sure that you get what you need and avoid distractions.
Read More: What are the top 7 Security Software for Windows 10?
- Select the folder where you want to install XAMPP and Click Next.
- Uncheck the box and Click on Next.
- Once the process is finished, close the Installation module.
Guide to Configure XAMPP

After the installation is finished, you have to configure XAMPP before you can use it. The control panel in XAMPP has three sections including the module section and the Admin section. The module section features all the web services. This screen also shows developers the IP port number and the process ID number of each service when it is started. Go to the admin section to check all the services and verify that they are working as they should be.

