Technology made our lives easier, like the Wake-on-LAN feature in the Windows operating system that enables users to turn on their computers from a mile away remotely, and they don’t even have to push the physical power button to do so. Setting Wake-on-LAN is tricky and requires you to toggle through menus but don’t worry, as this WoL has covered you. Before moving to the guide, learning what Wake-on-LAN is and how it works is essential.
What is Wake-on-LAN?
In the mid-90s, Intel and IBM joined hands to create a new feature so users could manage computers remotely through the network. This resulted in creating the Wake-on-LAN feature that uses an ethernet connection. The computer will be powered off into a low-power mode for this feature to work, but you can turn it on without pressing a button. You can save electricity by keeping the computer in low power mode and turning it on remotely whenever possible.
How does Wake-on-LAN work?
Wake-on-LAN or WoL requires the right motherboard and the network card to work, so you must check them first. If you have an ATX-compatible motherboard, you’re good to go. The second requirement is the network card, as not all cards support the wake-on-LAN feature. You don’t have to install any third-party software to enable this feature. Everything can be done from the BIOS menu and the firmware menu.
Over the past decade, the Wake-on-LAN feature has become an industry standard. If you are building your computer, purchase a card that supports the WoL because you never know when you will need this feature. You will send a magic packet to the adapter, and when the adapter recognizes it, the computer will be powered up. Magic packets are specific for each device.
Methods to Enable Wake-on-LAN
Now that you understand what Wake-on-LAN means and how it works, it is time to configure your device so you can use the WoL feature to remotely turn the computer on while sitting thousands of miles away. There are two methods to enable WoL in Windows 10, which are given below.
1. From BIOS
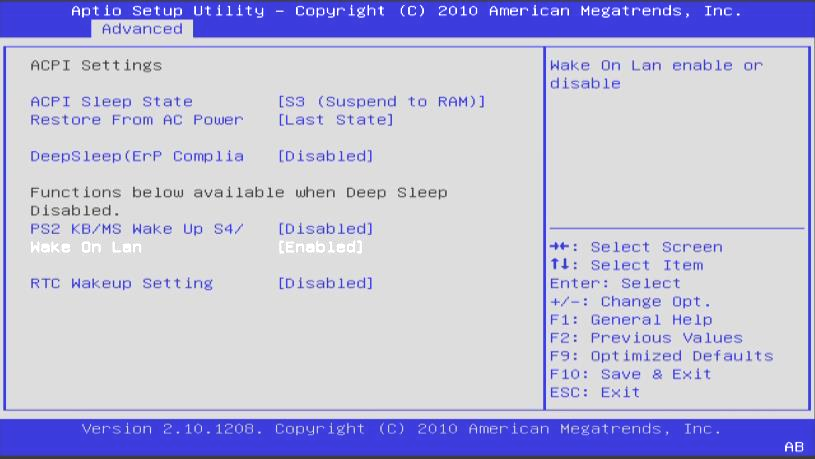
To use the Wake-on-LAN feature, you will have to enable it from the BIOS. For this purpose, you have to restart the computer first. Enter the BIOS menu by pressing the F2 key continuously. For some motherboards, you may have to press another key from the keyboard, such as Delete, to enter this menu. Once in the BIOS menu, find the Adapter settings.
The location of the adapter menu can also change from motherboard to motherboard. Most manufacturers’ location is in the Advanced mode from the BIOS menu. Toggle through the BIOS menu, find an option that states “Power On by PCI-E,” and enable it. Once the ethernet adapter receives the right magic packet, this option will turn on your computer.
As you already know, the Wake-on-LAN feature in the BIOS menu is hidden in settings and unavailable in basic computers. If you can’t find this in your BIOS, don’t worry and check the manufacturer’s official website for details.
2. From Operating System
Now that you have configured the BIOS menu and enabled this feature, you must also turn it on from the operating system. The steps to allow this feature to change from the operating system to the operating system, so a complete guide for each operating system is given below.
1. Windows Operating System
- Find the Network adapters section from the device manager.
- Select Ethernet and right-click on it.
- Go to properties of Ethernet.
- Go to Power management.
- Check all the boxes.
- Apply settings.
You must manually enable this feature from the device manager for all available network devices. Go to the advanced section from the properties menu for the wireless adapter and enable the “Wake on the magic packet” feature. Although this isn’t necessary for all adapters, you shouldn’t leave room for errors. Once you have configured all adapters, restart the computer, and you are ready.
2. Linux
Using Ubuntu Linux, you can use the built-in tool to check whether the computer supports WoL. If it does support Wake-on-LAN, you can directly enable it using that tool. Here are more details about how you can enable WoL in Linux.
- Go to the terminal.
- Enter the “sudo apt-get install ethtool” command to install the ethtool.
- Check the compatibility of the hardware by entering the “sudo ethtool eth0” command.
- Find “Supports wake-on.”
- Enable Wake-on-LAN by entering the “sudo ethtool -s eth0 wol g” command.
3. macOS
If you are a macOS user, here are the steps to enable the Wake-on-LAN feature.
- Go to the System Preference section.
- Tap on the Battery option.
- Find “Wake for Network Access” and enable it.
How to use Wake-on-LAN?
Once you have enabled the Wake-on-LAN feature from both BIOS and operating system settings, you must use a third-party app to send the magic packet to a device and wake it up without pressing the power button.

