Whenever you try to delete the file from Windows 10, it gets removed from the folder, but it remains on the disk and can be restored easily using some data converting tool. But some data is unnecessary to be repaired, or there might be some private data you don’t want to be restored by anyone. In such cases, you can work on windows unallocated disk.
There are different methods and solutions to unallocated the disk in Windows 10. Still, in this article, you’ll experience the most appropriate ways to get the unallocated disk fix within a few straightforward steps. So, let’s explore how it is going to work.
What is Unallocated Disk Space Windows 10?
An unallocated space Windows 10 is an available space in the hard drive of a PC that is not assigned to any partition. It is a space from which no files or data can be restored when allocated. You can adjust the unallocated disk space in Windows 10 according to your need or requirements. With the help of unallocated Space in the hard disk, you can manage the overuse of the hard disk by the deleted files and data.
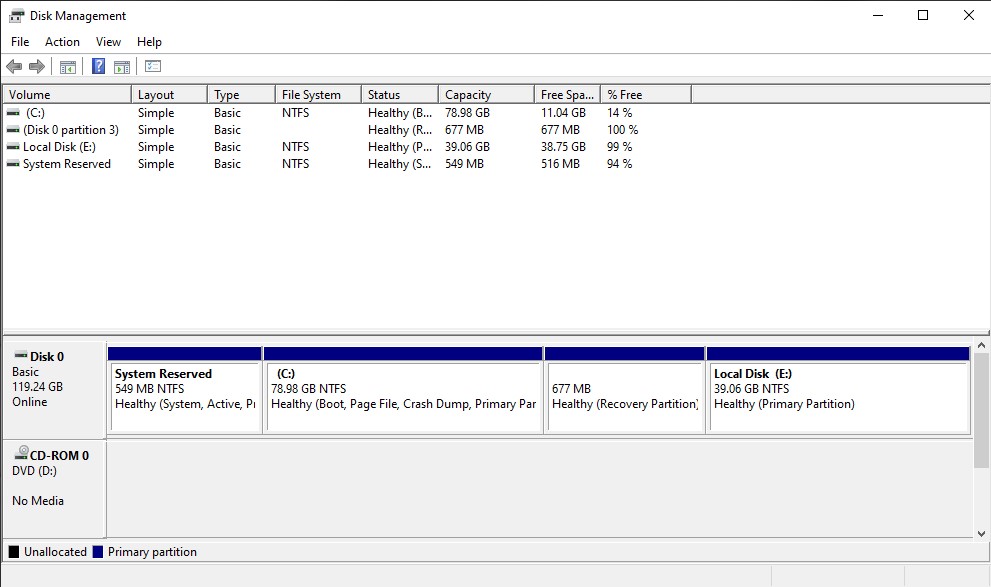
To view the unallocated disk space in Windows 10, open Disk Management by searching in the windows search bar. In Disk Management, the unallocated disk space in Windows 10 is highlighted in black. As shown in the image below, the Black box indicates the unallocated Space in windows 10. Since there is no unallocated space, no black area is visible on the screen.
Why do We Need to Unallocated the Disk in Windows 10?
There is always a solid reason behind doing something. So is the case with the unallocated disk in Windows 10. To better understand why you need to unallocated the disk, check out the following key points. Such points will help you to realize the importance of unallocated Space in a hard disk.
- Delete a Partition by Unallocated Disk
In case you are running out of Space, the unallocated disk can help you to remove the partition, and as a result, you can get free Space in the hard disk that can be used for something necessary. Thus, with the help of an unallocated disk, you can remove or delete the partition to better use Space in the hard disk.
- Create New Partition with Unallocated Disk
Use the unallocated disk to create a new partition that will be separated from the previously partitioned disk space. This allows users to enjoy a new partition disk. But this is only beneficial for those with a high hard disk level.
- Remove Malware From the PC
If you suspect your computer is dealing with Malware, use the unallocated disk option to delete all the existing data in the allocated Space and Partition the window. Malware is software specially designed to provide unauthorized access to pc which can disrupt or damage the settings in a computer.
- Applicable Before Installing a New Operating System In Computer
It is going to be beneficial to unallocated the disk in pc before working on the process of installing the new operating system. It ensures that there will be no conflicting partitions or any data that can cause any issues or lead to unacceptable conditions while installing the new operating system on the computer.
Best Methods for Unallocated Disk in Windows 10
There are several methods for unallocated disks in Windows 10. But this article will discuss the top 2 strategies that can be used quickly. To better understand, check out the detailed steps carefully and follow such steps properly without making any inconvenient attempts. Let’s go on with a step-by-step tutorial regarding the following two methods.
- Create New Partition in Hard Drive.
- Extend Adjacent partitions.
Create New Partition in Hard Drive
This fantastic method will teach you to create a new partition to fix windows’ unallocated disk. According to the report, it has been noticed that by creating a new section in the hard drive, users make the disk unallocated in a smooth and very accessible way. So, let’s move to the steps and learn how to create a new partition.
1. Open Disk Management
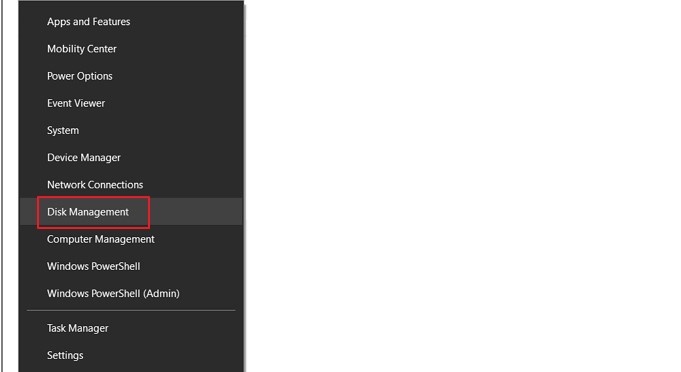
Take your mouse to the windows key that is given on the left bottom corner of the screen in Windows 10. Right-click on that window crucial and go on with Disk Management. In this tab, you can see several options, but you only must click on disk management to begin the further process. Let’s see what you must do in the upcoming steps.
2. New Simple Volume
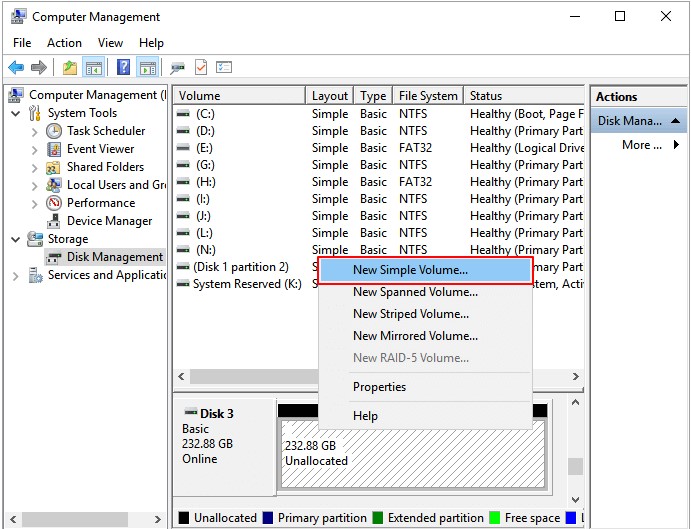
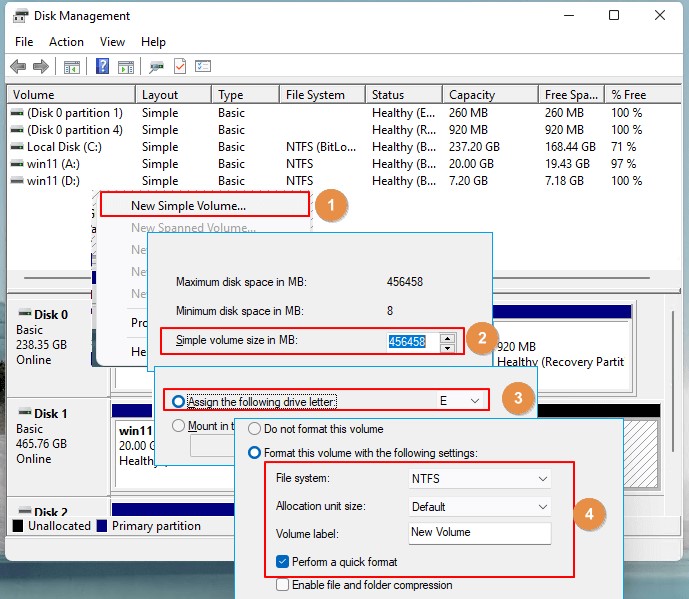
After clicking on disk management, you will see a new tab on the screen that shows the different kinds of Space occupied by other programs and systems. As we have discussed, that unallocated Space is indicated by black color. Please find out the unallocated disk and make right-click on it. When you right-click, a new interference will appear, and press on the New Simple Volume option given in the shortlist. To have a better understanding, check out the image below.
3. Adjusting The Settings of the new Simple Volume
Now, in a new simple volume, you must make settings according to your desire, such as size, file format, and drive. As you can see in the given image below, understand how it works. While making settings, click Next after each setup and review if you have done everything and made the adjustments correctly. You can also edit the New simple Volume that you just created. Once you think all settings are done, click Finish, and a new partition will be made on the disk.
Extend Adjacent Partition
Extending the adjacent partition, you can create an unallocated disk in windows 10. Remember to keep the unallocated Space next to the targeted Volume, which can be behind or in front of the drive-in windows 10. Check out the following steps carefully to extend the adjacent partition and unallocated the disk in windows 10.
1. Open Disk Management
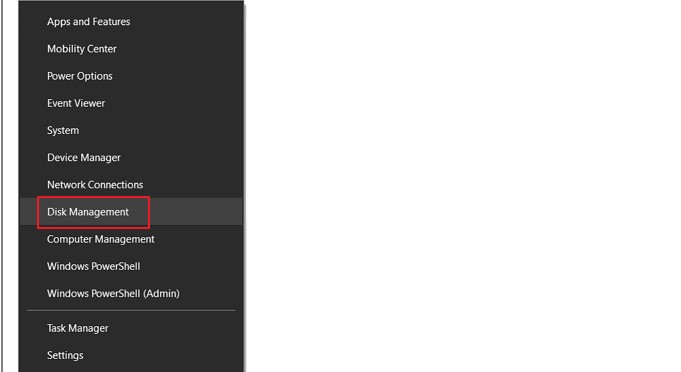
All the details about partitions and unallocated disks are available in Disk Management. Thus, to begin extending the adjacent cell, right-click on the windows key and go on with the Disk Management option, among other options given in the list.
2. Extend Volume
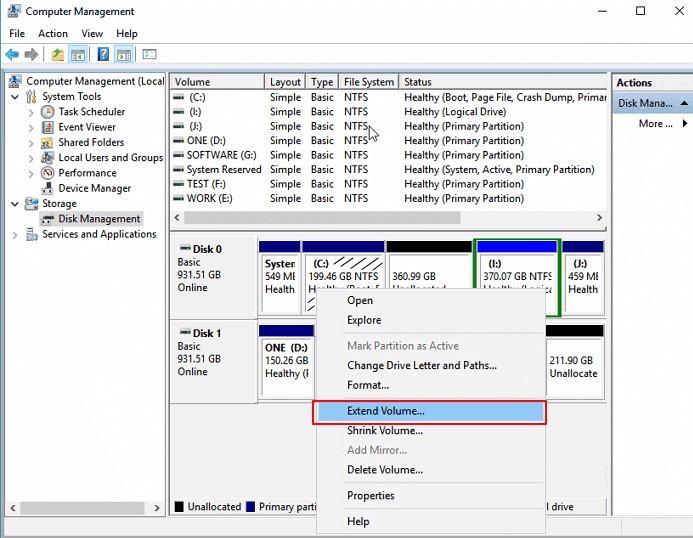
Once you’ve opened the disk Management, you can see the different drives on the screen. Here, you can choose Drive C or any other purpose you want to get the unallocated disk fix. For example, we will go on with C Drive. So, make right-click on C drive> Extend Volume. Now, extending the Volume of the adjacent partition will begin.
3. Selection of Unallocated Space
Next, a new interference will appear that will allow you to make changes and adjust the settings and information in the unallocated disk to extend the partition in Windows 10. In Extend volume Wizard, modify and must select the Unallocated Space. After going through and reviewing all the information, click on Next. A new tab will show you the disk to which you decided to extend the Volume. Check all the settings again and click Finish once you are done.
Conclusion
In this article, you will experience the importance of an unallocated disk in Windows 10 and how to activate it. It is advantageous to unallocated a disk when running with a shortage of hard disks. Also, you still don’t want your deleted data to occupy Space in your hard disk. In that case, you can use an unallocated disk so the deleted data will be permanently removed from your computer, and you can use that Space for some important purposes. We hope you find this article beneficial.

