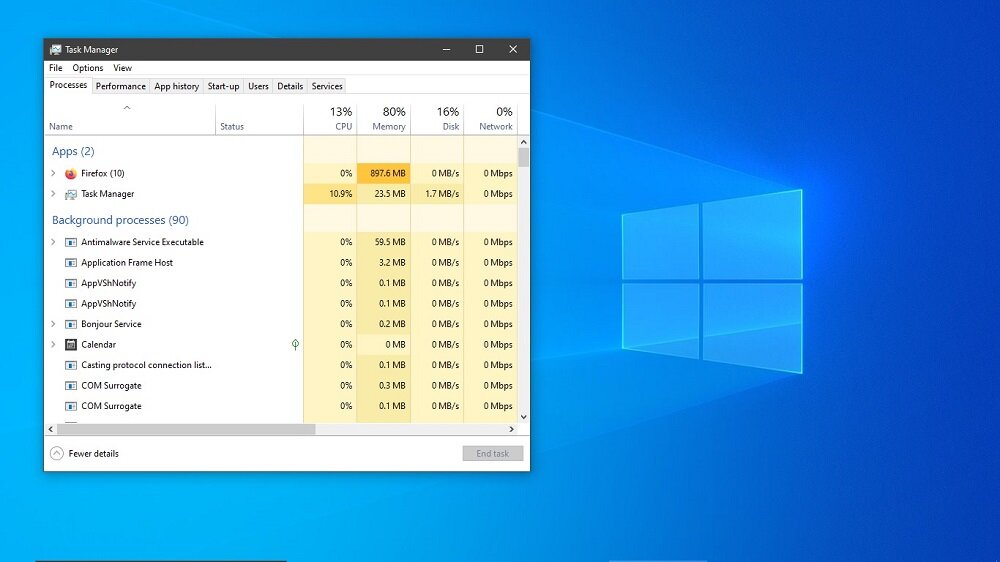
Wsappx? Have you heard about this term before? If you think 8, 10, or 11, you must be familiar with this term. It is a significant and essential part of Windows but sometimes, due to some error or unusual activity. Your CPU may work very slowly even if you run a few programs on your PC. Abnormal activities of Wsappx occupy the high CPU usage that results in slow and gradual speed.
There is no need to work on your slow-running PC because we are here to bring you a solution; I can help you speed up your PC’s processing rate. You may need to know the proper definition or concept behind Wsappx. Thus, in this article, you will find Wsappx and how to fix this Windows error that occupies high CPU usage.
What is Wsappx in Windows?
Wsappx is an essential Windows software that provides Microsoft’s universal application and other software to install on your PC. It is a crucial part of Microsoft Windows that is only available in Windows 8,10, and 11. Users need help finding Wsappx access in Windows 7 because there is no such Microsoft store to bring all the universal software directly into the PC. Wsappx is only activated during installing and updating any application from the Microsoft store.
Some errors may access Wsappx to occupy high CPU usage and slow down the PC’s speed. Besides, it does not have any adverse effect on the PC. But slow processing of the CPU is very irritating, especially in a hurry.
Why is Wsappx Occupy High CPU Usage?
Before we further discuss the solutions to fix the Windows error regarding Wsappx, we need to understand the reasons behind this error. Sometimes, you will find Wsappx (2) or Wsappx (3) on your screen occupying high CPU usage. To find the perfect and effective solution to resolve this error, check out the following reasons to have a better understanding.
1. Activation of Microsoft Store
In upgraded Windows versions such as Windows 8,10, and 11, the Microsoft store is essential to perform the installation process on the PC. During the use of Microsoft Store, the Wsappx gets activated to occupy high CPU or Hard disk usage. Whether you are installing or updating, Wsappx will require a high processor to perform downloading process. So, it is one of the fundamental and top-noted reasons for Wsappx’s high CPU usage.
2. During Installation
Wsappx uses more resources from the PC during installation as such resources are required to make it successful. Even if you are making local downloads on your PC, Wsappx will need a specific amount of processing space to work and get your aimed file completely downloaded into your PC.
3. Updating Windows
If you are running Windows 10 on your PC, you must know that Windows needs to be updated often to get the latest features and versions of Windows. Updating the Windows and some essential software in the PC can be a reason to slow down the speed of the CPU. While editing, Wsappx is activated and provides the vital or required space to Windows to bring various new versions and features to the PC.
How to Fix Wsappx from Using High CPU?
Windows 10 is being used by people on a large scale. Because in Windows 10, users can experience several unique and latest features even without having a hefty Processor of CPU and RAM. But if you are running Windows 8 or 10, there is no need to be worried because the following methods are applicable for Windows 8, 10, and 11.
So, we will discuss every appropriate and most suitable way of resolving this matter in detail with step-by-step Windows guides.
Solution 1: Deactivate/Disable Windows Store
If you don’t need a Windows store often, you can deactivate or disable it to resolve this problem. If you can download or upgrade all the necessary software from the Internet without using the Windows Microsoft store, you can go on with this method and fix your problem. Let’s move to the step-by-step guidance regarding the deactivation of the Microsoft store in Windows. Deactivating the Microsoft store can be done with the help of the Local Group Policy and Registry Editor.
With the Help of a Local Group Policy
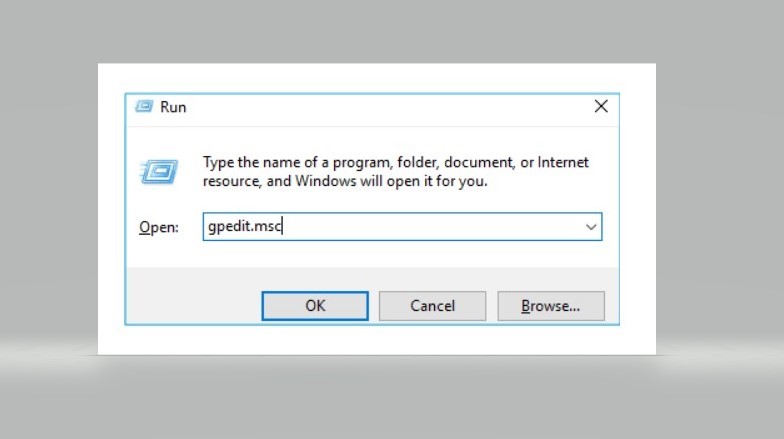
STEP 1: To begin the process, click on Windows Logo Key+R> Type “gpedit.msc”>OK.
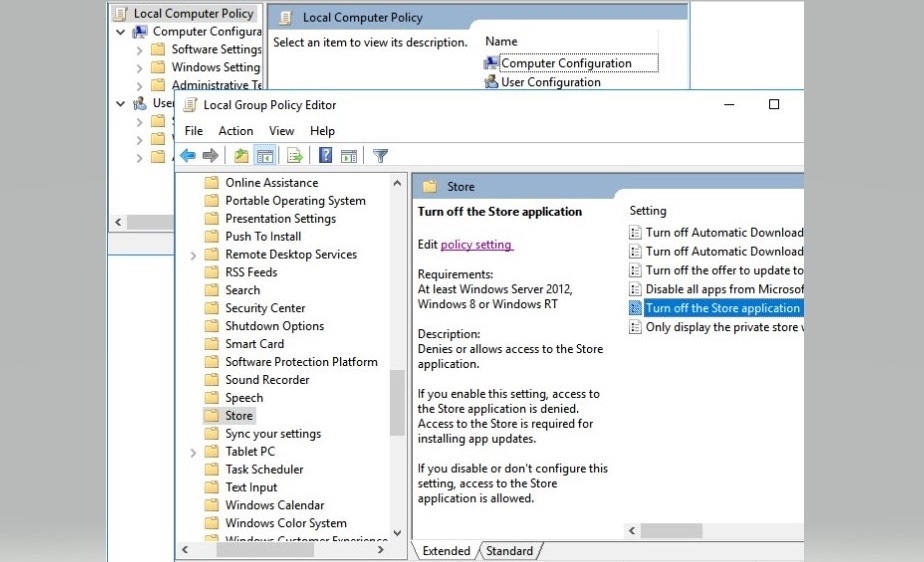
STEP 2: Move to the Local Computer Policy> Computer Configuration>Administrative Templates and expand the Windows components to find the Store option in the table. Click on the Store option>Turn off the Store application>Right click>Edit. Now you are done with this step.
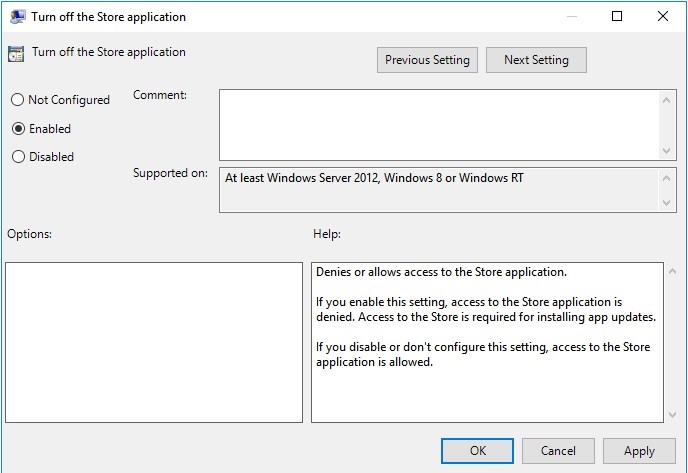
STEP 3: A page will appear where you can make the final step. To finish the fixing process, click Enabled>Apply> OK.
Restart your computer and check whether this method was helpful for you or not. If you are still facing the same problem, follow the next procedure step-by-step to fix your PC’s high disk usage problem.
Using Registry Editor
Remember that you must use this method precisely and accurately; any false or misleading step might cause a severe issue for your PC. Thus, be careful while following the steps of the given procedure below.
Step 1: Click on Windows Logo>Type “Regedit” in the search bar, and press Enter to enter Registry Editor. Click “Yes” to open the access table.
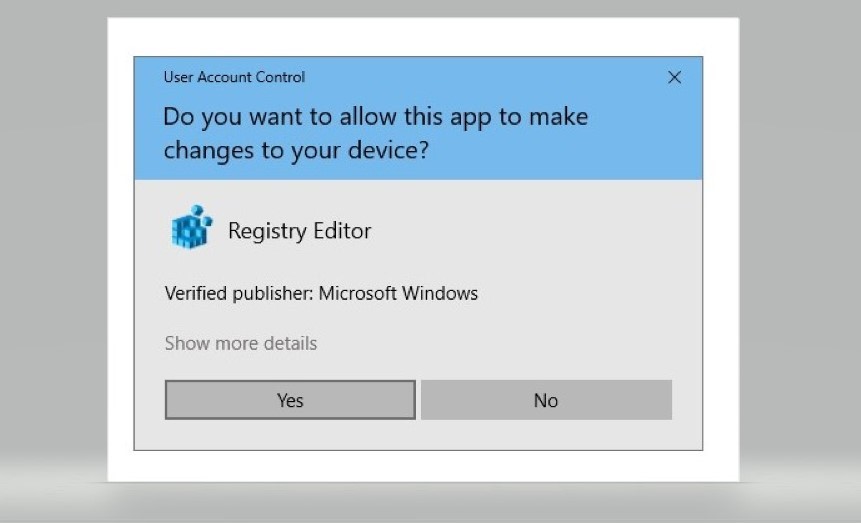
Step 2: In this step, navigate to HKEY_LOCAL_MACHINE/SOFTWARE/Policies/Microsoft/WindowsStore. Afterward, create a new DWORD value inside the Windows Store keys in administration control and name it “RemoveWindowsStore .”Also, don’t forget to set the value “1.”
Step 3: Save your changes and exit the registry edit program. Further, restart your PC, and you will find your work is done perfectly.
Solution 2: Perform the Disk Check
The disk check will benefit you if you frequently face high disk usage problems. It might take some time to get done, but it can be helpful for you to fix this Windows error. Focus on the following steps to perform accurate disk checking.
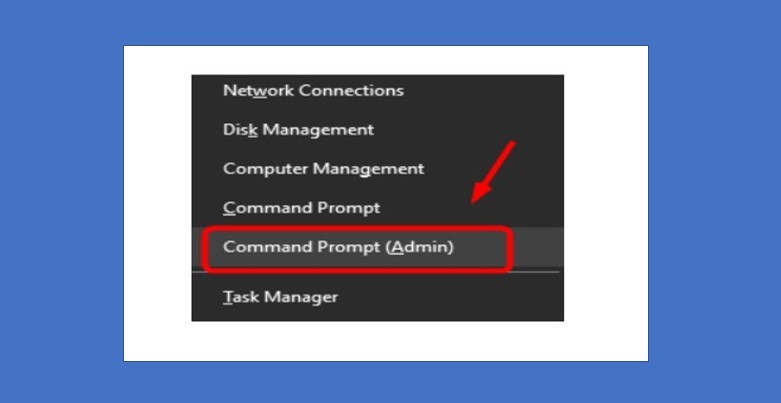
Step 1: Press Windows Key+X simultaneously and get to the Command Prompt (Admin).
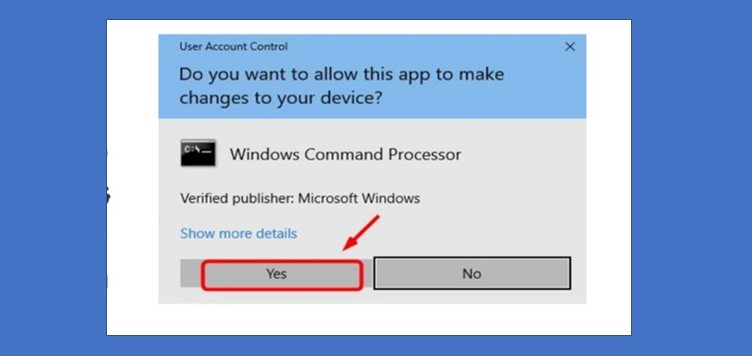
Step 2: Go with the option “Yes” at the user account control to proceed with the further process.
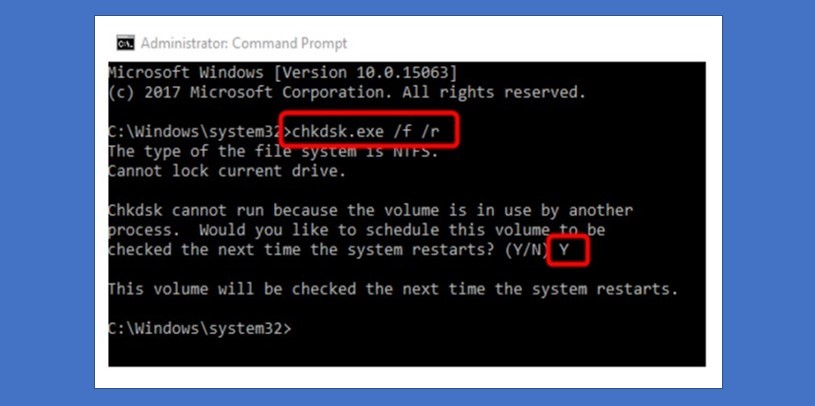
Step 3: Once again, you will get a command prompt where you must type “chkdsk.exe /f /r” in the section. Click on Enter>Y to confirm that you ensure to make a disk check. Further, restart your computer to get this project finish and resolve the Windows error.
Solution 3: Extend the Virtual Memory
One of the best ways to resolve the high CPU usage Windows problem is to extend the virtual memory, which can fully compensate Wsappx for not slowing down the PC’s speed during installation. Check out the following steps to boost the virtual memory in your PC.
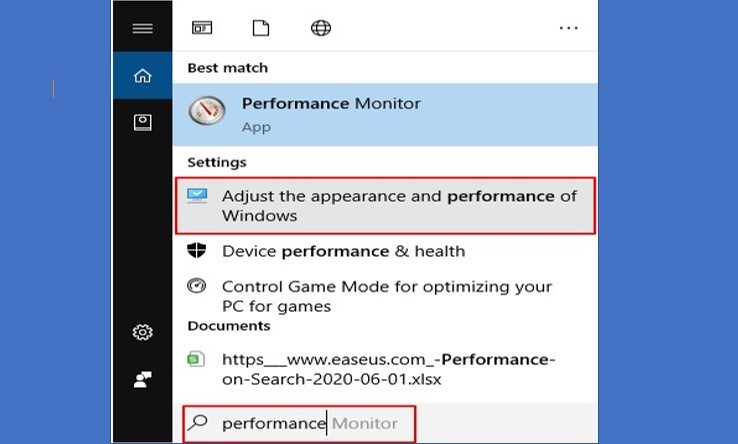
Step 1: Type in the search bar for Performance Monitor and then click on the “Adjust Appearance and Performance in Windows” option that will be given in the tab, as you can see in the picture below.
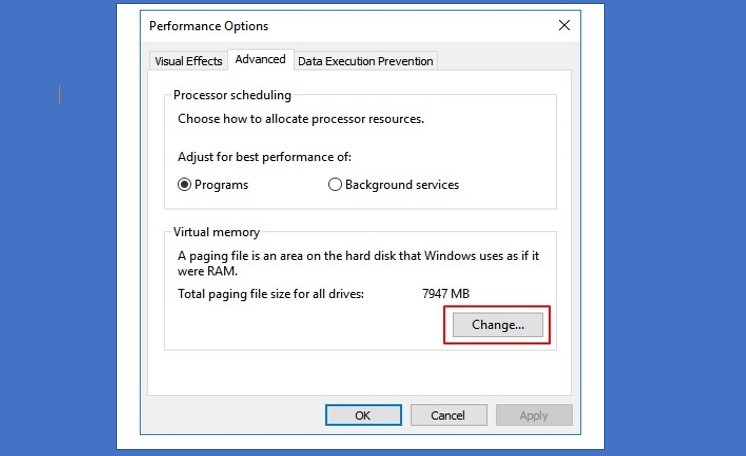
Step 2: A performance option will appear next, where you must click on Advanced>Programs>Change. From here, the process of boosting up virtual memory will begin.
Step 3: Here, in another tab, you must uncheck the “Automatically Manage paging file size for all devices.” Further, select OS drive>Custom size.
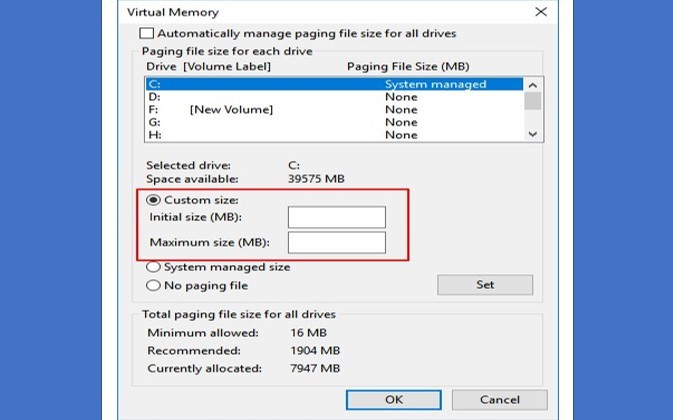
Step 4: The last step is to make changes in the RAM and MB size section. Once you have done this, it is time to do the final touch. Click on Set> OK, and you have finished the extending virtual memory process.
Solution 4: Scan Your Computer to Check for Virus
Several people reported that the reason behind their CPU running very slow is due to some virus. So, your PC might also have been dealing with a virus. Therefore, you should check virus activation on your PC. Follow the given steps below to check for viruses.
Step 1: First, activate antivirus software on your PC and let it scan your device; it might take a while to complete scanning.
Step 2: You will be notified once the antivirus software finds any suspicious files.
Step 3: Remove all the suspected virus files from the PC and restart it.
If any virus causes your PC to slow down, you can quickly fix this Windows error after performing the above steps.
Conclusion
We hope that you find this article very helpful for you and all the four solutions described in detail. This article comprises outstanding research through which you can quickly eliminate Wsappx occupying high CPU usage Windows error. So, enjoy your PC running faster even while installing the application. We have discussed the top reasons reported by people so you can quickly resolve your Windows error.

